By Matteo Martignago, cinematographer. Updated July 27, 2026, when all sources were last checked.
Butterfly lighting puts one light directly in front of your subject and well above their head, angled down, so the nose casts a small symmetrical shadow shaped like a butterfly. It is also called Paramount lighting, and sometimes Hollywood lighting. Almost every guide to it, including the earlier version of this one, says to place the light “at 45 degrees” without saying 45 degrees on which axis. Follow that literally and you will build loop lighting instead.
The two numbers that matter
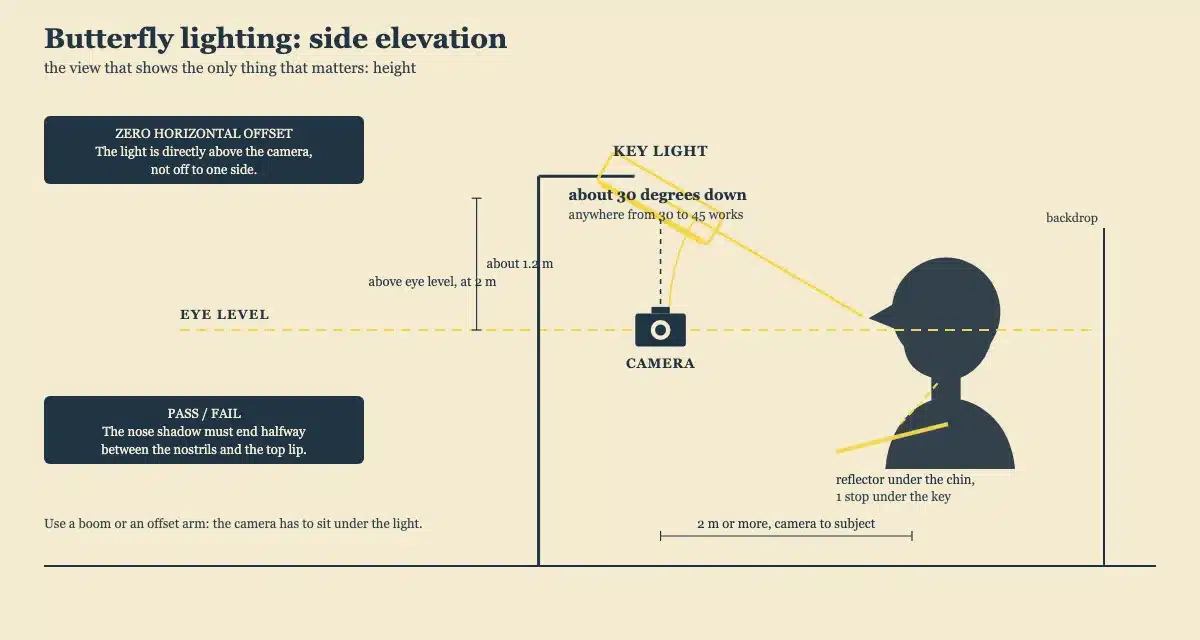
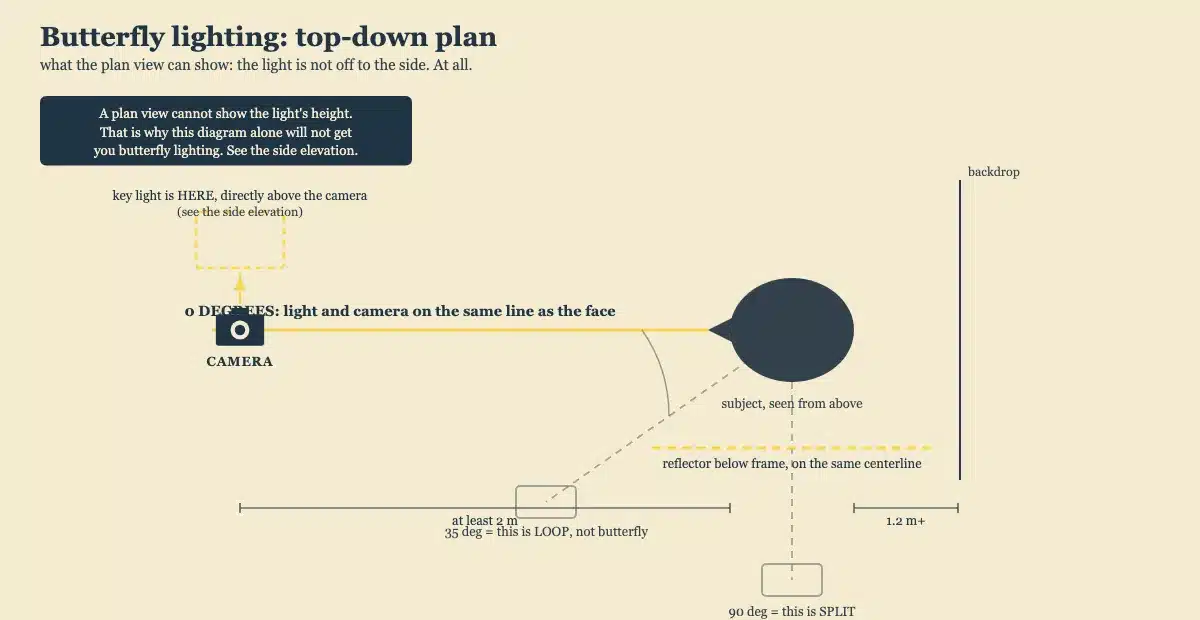
Horizontally the light is at zero degrees: dead in front, on the same line as the camera and the face. Vertically it is raised until the nose shadow appears, usually somewhere between 30 and 45 degrees down. Height is the whole technique, and it is the one thing a top-down diagram cannot show you.
Jump to
What it is · The diagram · How to set it up · Too low, correct, too high · Who it flatters · Butterfly, loop, Rembrandt, split · Modifiers and settings · Where the name came from · FAQ
What butterfly lighting is
A single key light, placed on the camera axis and raised above the subject’s head, throws a small shadow straight down from the nose. The nasal tip casts the body of the butterfly and the alae, the flared wings of the nose, cast a lobe on either side. Profoto names the pattern for exactly that: the shadow it creates under the subject’s nose.
There is one reliable test, and it is worth more than any angle in degrees. Raise the light until the nose shadow appears, and stop when that shadow ends roughly halfway between the nostrils and the top lip, which is close to how Westcott states it. Shorter than that and the light is too low. Longer and it stretches into something that reads as a mustache.
The technique has three names in common use and they all mean the same setup: butterfly, Paramount lighting (both Westcott and PetaPixel note the Hollywood-studio origin of that name), and occasionally Hollywood lighting. Glamour lighting is a genre, not this pattern, so the two are worth keeping apart.
Butterfly lighting is also a completely different thing in film
Worth clearing up, because Google is visibly unsure which one you mean and ranks a page about the other one on this very search. On a film set, a butterfly is a large overhead frame of diffusion fabric, made in standard sizes like 6×6, 8×8, 12×12 and 20×20 feet, rigged above a scene to soften direct sun. Same word, different object. Everything below is about the portrait pattern.
Butterfly lighting diagram
Start with the side view, because it is the only one that shows height, and height is what makes this pattern work.
Now the plan view, which is useless on its own but settles the question every other guide leaves open: how far round to the side does the light go? It does not. It stays on the centerline.
How to set it up
- Put the camera on the axis first. Directly in front of your subject, level with their eyes, at least a couple of meters back, on something in the 85mm to 135mm range for a head-and-shoulders frame.
- Put the key light directly above the camera. Not beside it. A boom or an offset arm earns its place here, because the camera has to sit underneath the light.
- Raise it until the shadow appears, then stop. Roughly 30 to 45 degrees down is the working bracket, but the bracket is a starting point and the shadow is the answer. Too low and there is no butterfly at all. Too high and the eye sockets go dark and you lose the catchlights.
- Set the distance by how soft you want it, not by a fixed number. What governs softness is the size of the source as seen from the subject, so a big modifier close in is soft and the same modifier far away is hard. Keeping it within about one and a half times its own width is a reasonable rule of thumb.
- Add fill from below, and you have built a clamshell. A reflector at chest height, tilted up under the chin, opens the shadow beneath the jaw.
The distance rule of thumb: The one-and-a-half-times figure is our own rule of thumb rather than a published standard. The underlying physics is not: apparent source size sets shadow-edge hardness, and light falls off with the square of distance, so moving a light from two feet to four costs you far more than moving it from ten feet to twelve.
That last step deserves its proper name. Butterfly describes where the key light goes; clamshell describes the finished setup once you add the fill underneath. Profoto’s own clamshell walkthrough starts by building a butterfly and then adds a reflector below. Some writers treat the two words as interchangeable, and at least one technical reference folds the bottom reflector into its definition of butterfly, so the boundary is genuinely contested.
Do not over-fill
Fill from below attenuates the very shadow that defines the pattern. Keep the fill at least a stop under the key. Push it further and you have flat beauty lighting, which is a perfectly good look, but it is no longer butterfly. Watch the reflector color too: a silver surface adds a second catchlight low in the eye, and a colored shirt will bounce its own cast up onto the neck.
Too low, correct, too high
One variable changes across these three. Nothing moves except the height of the light.
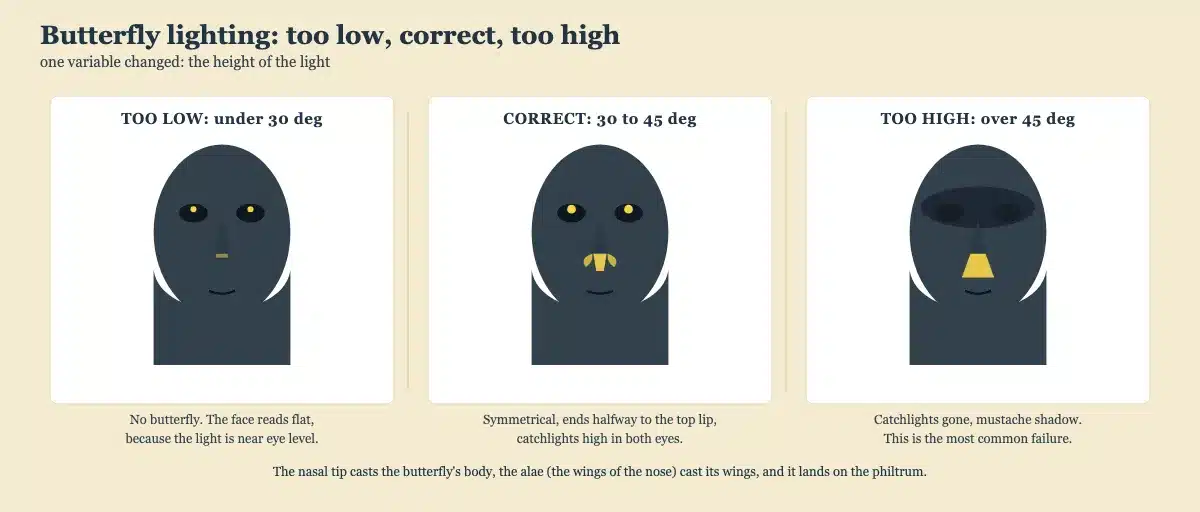
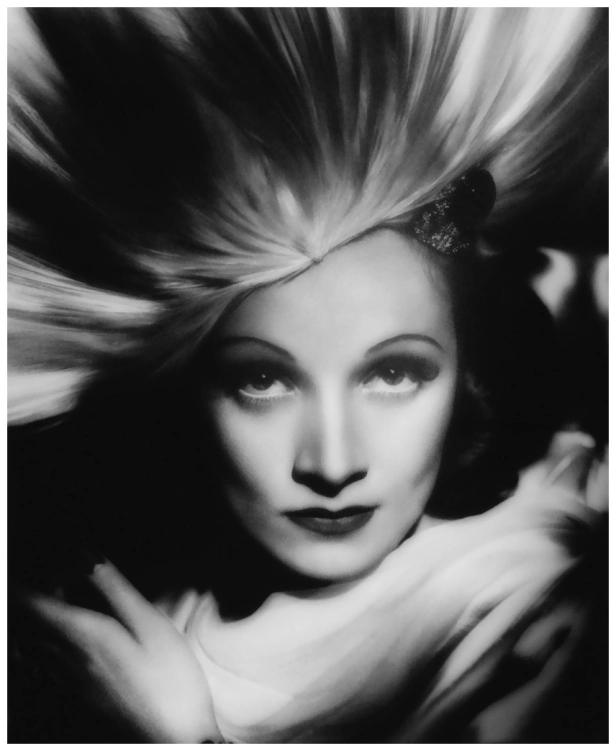
Who it flatters, and who it does not
Butterfly is horizontally a front light, which makes it the flattest of the directional patterns. Every bit of shaping it gives you is bought with elevation alone. That single fact explains both its reputation and its failures.
It rewards defined cheekbones and a clean jawline, because the only shadows available are the ones falling under them. The strongest agreed contraindication is deep-set eyes or a heavy brow: the same downward angle that carves the cheekbones drops the eyes into shadow and takes the catchlights with them. Lower the light or change pattern.
Round faces are genuinely contested. Some sources say the bilateral shadows slim the face; others say the absence of side modeling makes it read wider. Both are describing something real, and which one wins depends on how much bone structure there is to catch the light. On long narrow faces the top-down shadow can add unwanted length.
Skin texture is the one people get most wrong, including the earlier version of this page, which claimed butterfly lighting hides blemishes and wrinkles. It can do either. A frontal direction fills texture in, but a small, hard, high source carves it out. PetaPixel is blunt that blemishes and lines can be exaggerated by this style, especially with a 22 inch or smaller silver beauty dish. The variable is the modifier, not the pattern: a large diffused source close in is forgiving, and a small hard one is the least forgiving light in the studio.
On men it often reads oddly, and enough working photographers say so independently that it is worth taking seriously rather than dismissing as taste. If you want the shaping without the artifice, move to loop.
Butterfly, loop, Rembrandt and split are one variable
These are not four unrelated setups to memorize. They are four values of a single quantity: the angle between the centerline of the face and the light. You can change it by moving the light, or by leaving the light alone and turning the head.
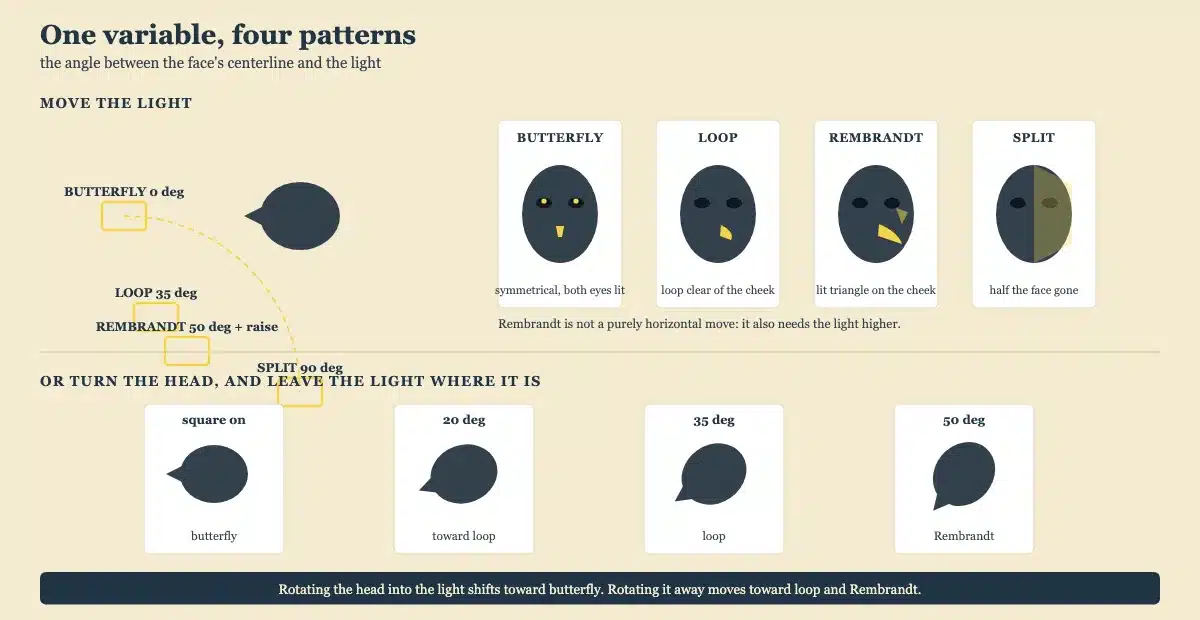
| Pattern | Light, horizontally | Shadow signature | One change from the row above |
|---|---|---|---|
| Flat | 0 degrees, at eye level | Almost none | The starting point |
| Butterfly (Paramount) | 0 degrees, raised above the head | Small and symmetrical under the nose, ending halfway to the lip | Raise the light until the shadow appears |
| Loop | About 35 degrees to one side | A loop of nose shadow on the cheek, not touching the cheek shadow | Swing the light 25 to 45 degrees off the centerline |
| Rembrandt | About 50 degrees, and higher | Nose shadow meets the cheek shadow, closing a lit triangle under the eye | Keep rotating and raise it: this is not a purely horizontal move |
| Split | 90 degrees, at the side | The face divides down the centerline, one half lit | Continue to a right angle. See our guide to split lighting |
Broad and short are a different axis
These two describe which way the head is turned, not where the light is, so they are easy to confuse with the progression above. Short lighting means the nose turns toward the light, leaving the camera-side cheek in shadow, and it is the flattering default for most modern portraits. Broad lighting is the reverse: the nose turns away, the camera-side cheek is lit, and the face reads wider. Butterfly is the square-on case where the distinction does not arise, though at least one source disagrees and treats butterfly as capable of either.
Modifiers and starting settings
The modifier changes this pattern more than any other choice you make, because it controls the one thing the pattern is sensitive to: how hard the shadow edge is.
| Modifier | Shadow edge | Skin | Catchlight |
|---|---|---|---|
| 22 inch silver beauty dish, no diffusion | Hard and defined | Least forgiving: exaggerates texture and blemishes | Small and bright |
| 22 inch white beauty dish | Softer, less contrast | More forgiving; roughly a stop less light than silver | Small and round |
| 65cm or larger softbox, diffused | Soft | Forgiving | Large and rectangular |
| Octabox, 36 inch or larger | Softest of these | Most forgiving | Round, which many photographers prefer in the eye |
| Beauty dish with a grid | Hard, and controlled spill | Unforgiving but precise | Small |
| Starting point, from | Shutter | Aperture | ISO | Notes |
|---|---|---|---|---|
| SLR Lounge‘s reference, the same across all five patterns | 1/200 | f/4 | 100 | Flash at 1/8 power |
| A working headshot setup reported on a photography forum | 1/200 | f/8 | 400 | Octabox in front angled down, white reflector below, key to fill about 2:1 |
| Two speedlights stacked vertically | 1/200 | varies | 100 | Upper unit at 1/8, lower at 1/32 to imitate a reflector |
On lenses: something in the 85mm to 135mm range on full frame is the usual choice, because it compresses the face pleasantly and keeps you at a comfortable working distance. A very wide maximum aperture is largely beside the point for this technique, since you will be stopped down anyway.
Where the name came from, and who did not invent it
The earlier version of this article stated that butterfly lighting was first used by Josef von Sternberg in the 1930s, and linked his Wikipedia page as the source. That page does not mention butterfly lighting anywhere. We are correcting it here explicitly because the claim has since been repeated back to us by search engines citing this very site, which is a good reason to be careful about what a photography article asserts as history.
What can be said with reasonable confidence is narrower and more interesting. Paramount ran a portrait department from the early 1920s, and the high frontal key became a house style there, which is where the name Paramount lighting comes from. Von Sternberg joined Paramount in 1927 as, in the studio’s own words, a “technical advisor for lighting and photography”, and went on to direct Marlene Dietrich in six features there between 1930 and 1935. Credit for the look on those films is contested even among the people who were there: Lee Garmes won the Academy Award for cinematography on Shanghai Express, and Dietrich maintained von Sternberg was responsible for most of it.
No credible source names an inventor, and the honest description is that this was a studio convention that particular people became associated with.
Frequently asked questions
What is the three-point lighting rule, and is this it?
No, and they are different kinds of thing. Three-point lighting is a rig: a key, a fill and a back light. Butterfly is a pattern, defined by where one key light sits relative to a face. Adding a reflector to a butterfly setup still does not make it three-point, because a reflector is not a third source and there is no back light in it.
Can you do butterfly lighting with one speedlight?
Yes. Put it in a softbox on a boom directly above the camera and work by test frames, since a speedlight has no modeling lamp to show you the shadow before you shoot. If you have two, stacking them vertically and running the lower one two stops down imitates the reflector.
Can you get butterfly lighting from a window?
Only from a high window. Put your subject square-on to it and close, with something white below the chin. The reason this usually fails indoors is simple geometry: most windows are at or below head height, so there is no downward angle available and no nose shadow appears.
Why has my butterfly shadow disappeared?
Three usual causes. The subject turned off the light axis, which quietly converts the pattern to loop. The light is too low. Or the source is so large and so close that the shadow has no defined edge left. Photographers disagree about whether the light should follow a turning head or stay put on the camera axis, so decide which you are doing rather than drifting between them.
Does butterfly lighting work with glasses?
Often better than side light does, because a source directly in front reflects back along the camera axis in a predictable place rather than skimming across the lens. If you do get a reflection, tilt the temples down slightly to angle the lenses away, or move the light a little. Do not ask people to take their glasses off and squint.
What should the reflector be, and can it cause problems?
White for most work. Three things to watch, none of which get much coverage: a silver reflector adds a distinct second catchlight low in the eye rather than a soft highlight; a strongly colored shirt will bounce its color up onto the neck and jaw; and too much fill erases the separation between chin and neck, which makes the subject read heavier.
What mood does butterfly lighting create, and does it work for video?
Polished, controlled and presentational. It is the light that says a face is being presented rather than observed, which is exactly why it belonged to studio portraiture and why it still reads as classic. It works for video with a continuous source, with one constraint worth planning around: the subject has to hold the axis, so it limits how much they can move.
Related: split lighting, posing models, and color theory for photographers.