Rasterizing in Photoshop converts vector or text layers into normal pixel-based layers. Vectors and text stay fully editable as vectors, but you can only apply certain effects to rasterized layers. Mastering rasterizing unlocks more creative options in Photoshop.
This guide covers everything about rasterizing in Photoshop. You’ll learn when rasterizing is required, how to rasterize different layer types, the pros and cons, and follow a step-by-step tutorial.
Know When to Rasterize in Photoshop
Don’t rasterize layers unless you need to. Rasterizing limits future editing.
Only use it for these reasons:
- To use tools such as Eraser, Paint Bucket, or Clone Stamp on vectors or text. These tools require pixels.
- To apply layer styles like drop shadows or strokes to vectors or text. Layer styles need pixels.
- To merge a vector/text layer using Merge Layers. This requires pixel layers.
- To apply filters to vector shapes or text. Filters work on pixels only.
- For detailed pixel-level editing of a vector or text layer. Vectors and text stay editable but don’t allow pixel edits.
- To change the stacking order of a vector/text layer relative to other layers. Pixels give you better layering control.
In summary, rasterize when you need pixel control for editing, filters, or effects. Otherwise, keep vectors and text editable.
Rasterize Layer Types
Use specific rasterizing techniques for vectors, text, and Smart Objects:
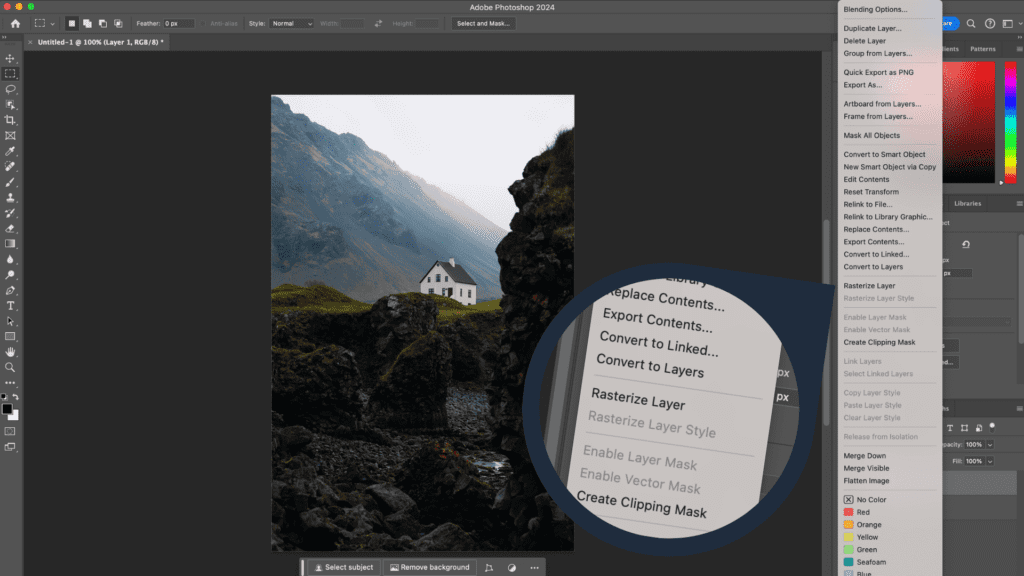
Vectors – Right-click a vector layer in the Layers panel and choose “Rasterize Layer”. This pixels the vector shapes.
Text – Right-click the text layer and select “Convert to Shape” to outline the text. Then right-click again and choose “Rasterize Layer” to pixelate it.
Smart Objects – Right-click a Smart Object layer and pick “Rasterize Layer”. This converts it into regular pixels but keeps the image data intact.
Simple right-clicks convert vectors or Smart Objects. Text takes a quick two-step process.
Compare Rasterizing Pros and Cons
Before converting layers, weigh the advantages and downsides:
Pros
- Use pixel-only tools like Eraser, Paint Bucket, etc.
- Apply layer styles like drop shadows and bevels.
- Use filters and adjustments.
- Get pixel-level control for editing.
Cons
- Can lose quality if scaled up.
- Text and vectors become uneditable.
- Increases file size over vectors/text.
- Effects and filters get baked in permanently.
Duplicate layers before rasterizing to retain original vectors.
Tutorial: Rasterize a Layer in Photoshop
Follow these steps to rasterize layers in Photoshop:

Rasterizing a Vector Layer
- In the Layers panel, select the vector layer you want to rasterize. This can be a shape layer, Pen path, etc.
- Right-click on the layer.
- Choose “Rasterize Layer” from the menu.
- The vector shapes will now be converted into a normal pixel-based layer, allowing pixel editing, effects, etc.
Rasterizing a Text Layer
- In the Layers panel, select the text layer you want to rasterize.
- Right-click on the layer.
- Choose “Convert to Shape” from the menu. This will change the text into vector outlines.
- Right-click on the layer again.
- Choose “Rasterize Layer” from the menu.
- The text outlines will be converted to pixels, allowing full editing control.
Rasterizing a Smart Object
- In the Layers panel, select the Smart Object layer you want to rasterize.
- Right-click on the Smart Object layer.
- Choose “Rasterize Layer” from the menu.
- This will convert the Smart Object into a normal pixel layer while retaining the image data.
Use these simple right-click rasterizing techniques for fuller creative control over your layers in Photoshop.
Tips for Rasterized Layers
Keep these tips in mind when working with rasterized layers:
- Check layer stacking order first. Rasterized layers may cover other layers.
- Duplicate before rasterizing to retain original vectors/text.
- Adjust blending modes and opacity to blend the layer.
- Use layer masks to selectively hide the layer.
- Lower resolution to reduce file size if needed.
- Rename for easy identification.
- Group with other layers to stay organized.
- Save a copy of your PSD as a backup.
Use these tips plus the rasterizing steps to gain full control over pixelating layers in Photoshop.
Conclusion
Use these Photoshop rasterizing techniques to unlock more editing possibilities with your layers. Strategically convert vectors, text, and Smart Objects to pixels for fuller creative control. With the right approach, formerly limited layers become flexible canvases for filters, effects, painting, and adjustments in Photoshop.
FAQ – Rasterize in Photoshop
Rasterization is the process of converting a vector image or layer into a pixel-based image in Photoshop. This is often done to apply certain effects or adjustments that are not possible with vector images.
To rasterize an image in Photoshop, you can right-click on the layer you want to rasterize in the Layers panel, and then select “Rasterize Layer” from the dropdown menu.
You need to rasterize a layer in Photoshop when you want to apply certain adjustments or filters that are only applicable to rasterized layers, or when you need to work with pixel-based editing tools.
Rasterizing a layer in Photoshop converts it from a vector or smart object into a pixel-based layer, which may result in a loss of quality, especially when scaling or transforming the layer.
To avoid rasterizing a layer in Photoshop, you can use adjustment layers, smart filters, or layer masks to make non-destructive edits without the need for rasterization.
Common Photoshop tools used when rasterizing a layer include the eraser tool, brush tool, paint bucket tool, and various selection and transform tools for editing rasterized pixel-based layers.
While Photoshop has limited vector editing capabilities, it is generally preferred to create or edit vector images using software designed specifically for vector graphics, such as Adobe Illustrator.
Before rasterizing a layer in Photoshop, you should consider making a duplicate of the layer to preserve the original vector or smart object, and ensure that rasterization is necessary for the specific edit or effect you want to apply.
When rasterizing a text layer in Photoshop, the text is converted to pixels, and its editability and scalability as a text layer are lost. Therefore, it’s important to finalize text edits before rasterization.
To maintain image quality when rasterizing in Photoshop, it’s important to work with high-resolution images or vector graphics before rasterization and avoid excessive scaling or transformation of rasterized layers.


