By Matteo Martignago, cinematographer and colorist. Updated July 2026.
Some links below are affiliate links. As an Amazon Associate, Artistic Hive earns from qualifying purchases, at no additional cost to you.
What is split lighting?
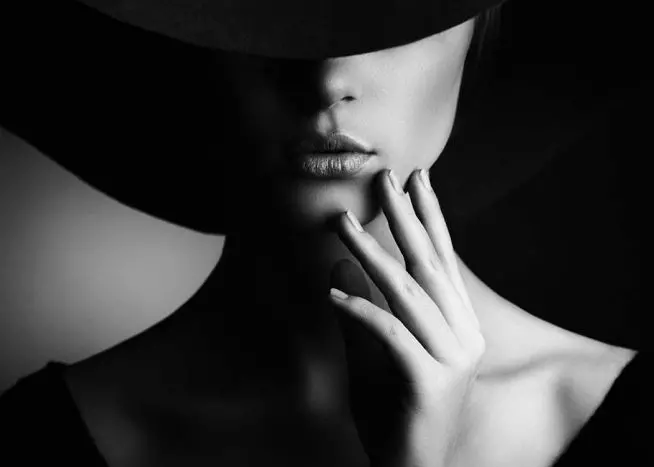
Split lighting is a portrait lighting pattern in which a single key light sits about 90 degrees to the side of the subject and slightly above eye level, lighting one half of the face and leaving the other half in shadow. The light and shadow meet in a line down the center of the face for a bold, high-contrast look.
What defines split lighting is the shape and position of the shadow, not the exposure or the shutter speed. It is one of the standard portrait lighting patterns, alongside Rembrandt, loop, and butterfly, and it is the most dramatic of the group. It also needs only one source, whether that is a studio strobe, an LED panel, or a window, which makes it one of the cheapest ways to get a cinematic portrait.
Why and when to use split lighting
Reach for split lighting when you want mood and high contrast. It suits anything meant to feel intense or a little mysterious: character studies, editorial and fine-art portraits, cinematic and noir looks, and strong, athletic subjects. Because the light rakes across the face from the side, it emphasizes skin texture and bone structure like the jawline and cheekbones, which is why it flatters rugged, characterful faces and can visually narrow a wider one.
That same raking light is unforgiving on blemish-prone skin or a prominent nose unless you soften it, so it is not the default for a clean beauty portrait. You will also hear split lighting called a masculine or dramatic pattern. Treat that as a convention rather than a rule: hard shadows tend to read as strength or edge, so split is popular for male, athletic, and villainous looks, but it is used to great effect across editorial, fine-art, maternity, and boudoir work too. For a safe, flattering everyday portrait, loop or butterfly is the gentler choice; reach for split when you want the hardest look in the room.
How to set up split lighting, step by step
The whole technique comes down to where you put one light. Any single source works: a strobe, a continuous LED video light, or daylight from a side window. If you are just getting comfortable with a camera, our beginner photography tips pair well with this. Here is the setup from above.
- Place the key light 90 degrees to the side. Put it directly out to the subject’s left or right, perpendicular to the line between camera and subject. On a clock face with the subject in the center, that is the 3 o’clock or 9 o’clock position.
- Set the height at eye level or slightly above. Around 15 to 20 degrees above eye level drops a subtle shadow under the brow and cheekbone on the lit side. Too high and the face looks under-lit and hollow.
- Have the subject face the camera fairly straight. This lets the shadow fall straight down the center, along the bridge of the nose, splitting the face into two roughly equal halves. Turning the head changes which side is lit and how big each half is.
- Check the catchlight. A true split gives a single catchlight, in the eye on the lit side only; the shadow-side eye stays dark, which is what reads as moody. If you want a hint of light in the shadow-side eye, nudge the light just forward of 90 degrees, a small step toward the camera (roughly 8:45 or 3:15 on the clock face), without breaking the split.
- Expose for the lit side. Meter the bright half of the face and let the shadow side fall as dark as the mood calls for. How deep that shadow goes is a choice you control next.
How to control the shadow: contrast and ratio
The 90-degree position creates the split; the depth of the shadow is a separate dial. Lighting ratio, the difference in brightness between the lit and shadow sides, is the real mood lever, and you set it with fill, not with your shutter speed.
Deepen the split
For a near-black shadow side and the hardest look, cut the fill. Remove any reflector, and place a black flag or black card on the shadow side to absorb stray bounce. A smaller or harder source, such as a bare head or a grid, sharpens the dividing line, and exposing for the lit side lets the unfilled shadow drop dark.
Soften the split
To keep the half-and-half look but bring detail back into the shadow, add fill on the shadow side. The simplest option is a white reflector or bounce board just out of frame, which kicks a little light back and lifts the shadow to a more moderate ratio, roughly 3:1 or 4:1. A larger, closer, softer source also eases the transition. Feathering helps too: aim the light so the subject sits at the edge of the beam rather than its hot center, which tames the highlight on the skin.
One point that trips people up: moving a light closer makes the source effectively larger relative to the subject and gives a softer shadow edge, while moving it farther away makes it effectively smaller and the edge harder. Source size and quality, not the pattern itself, control how crisp the split line looks.
Split lighting vs. the other portrait lighting patterns
Split is one of six standard portrait patterns. Here is how it compares to the other five.
| Pattern | Key light position | Shadow signature | Catchlights | Best for |
|---|---|---|---|---|
| Split | ~90 degrees to the side, eye level to slightly above | Straight down the center; half lit, half shadow | One (lit side) | The boldest, highest-contrast look; character, editorial, and noir portraits |
| Rembrandt | ~45 degrees to the side and above eye level | Nose shadow meets cheek shadow, leaving a lit triangle under the eye | Both (usually) | A dramatic but more three-dimensional look; classic and timeless |
| Loop | ~30 to 45 degrees off camera, slightly above | Small downward loop of nose shadow that does not touch the cheek shadow | Both | The most versatile, flattering everyday pattern |
| Butterfly (Paramount) | High and directly in front, on the camera axis | Small symmetrical shadow under the nose | Both | Polished glamour and beauty work |
| Broad | Orientation: the lit side faces the camera | Shadow on the far side | n/a | Filling out or widening a narrow face |
| Short | Orientation: the lit side turns away from the camera | Shadow on the near, camera side | n/a | Slimming and adding dimension; a common flattering choice |
Broad and short describe which side of the face is lit rather than a specific light position, so you can combine them with loop, Rembrandt, or even split.
Tips from behind the lens
- Decide the shadow depth before you shoot. A true unfilled split grades to near black and reads as menace; a reflected fill at 3:1 keeps the edge but shows skin detail. Choose the ratio to match the story; don’t leave it to chance.
- Feather to protect the skin. The hottest part of the beam is harsh on texture. Turning the light so the subject sits at its edge softens the highlight without losing the split.
- Use the single catchlight on purpose. One bright eye and one dark eye is what gives the look its intensity. If a portrait feels too severe, the forward nudge that adds a faint second catchlight often rescues it.
- Watch the nose shadow. If the light drifts even slightly toward the front, the shadow creeps off center and you are heading toward Rembrandt. Keep it at a true 90 degrees for a clean split.
- Think in grades. Split lighting already builds contrast into the frame, so in the edit I protect the deep side rather than crushing it further, and let the lit side carry the detail. For more on shaping mood with tone, see our guide to color theory for photographers.
Split lighting FAQ
What angle is the light for split lighting?
About 90 degrees to the side of the subject, perpendicular to the line between camera and subject (the 3 o’clock or 9 o’clock position). At 45 degrees you get Rembrandt or loop lighting, not a split.
How high should the light be for split lighting?
At the subject’s eye level or slightly above it, roughly 15 to 20 degrees up. That height keeps the split clean and drops a subtle, flattering shadow under the brow and cheekbone on the lit side.
What is the difference between split lighting and Rembrandt lighting?
Split lighting places the key light at 90 degrees so the shadow falls straight down the center, splitting the face in half. Rembrandt lighting places it at about 45 degrees so the nose and cheek shadows join, leaving a small triangle of light on the shadow-side cheek.
Can you do split lighting with natural light?
Yes. A single side window makes an excellent split-lighting source. Turn the subject so the window is directly to one side at eye level, and if the light is harsh, diffuse it with a sheer curtain and add a reflector on the shadow side.
Is split lighting flattering, and who is it best for?
It is best for bold, character-driven portraits, and it emphasizes texture and bone structure. That makes it striking on strong, characterful faces but less forgiving on clean beauty work or a prominent nose unless you soften the shadow. Think of it as a convention rather than a rule; it is used across many genres, from editorial to boudoir.
When should you use split lighting?
Use it when the mood is the message: intensity, mystery, strength, or a cinematic edge. For a relaxed, universally flattering everyday portrait, loop or butterfly lighting is the safer default.
The bottom line
The whole technique is one light at 90 degrees to the side; the only real decision left is how deep to let the shadow fall. Master that, and moving the light to 45 degrees for Rembrandt or loop is a small step that hands you the rest of the portrait-pattern family.