The sunny 16 rule is one of the most useful techniques for photographers, especially those shooting film or learning the basics of exposure.
This simple rule of thumb allows you to estimate the correct exposure settings in sunny conditions, giving you a starting point to achieve well-exposed photos.
Read on for a complete guide to understanding and using the sunny 16 rule in your photography.
The basic premise of the sunny 16 rule is that on a sunny day with no clouds, if you set your camera to ISO 100, the correct exposure will be f/16 at a shutter speed closest to the reciprocal of your film speed.
For example, with ISO 100 film and sunny conditions, the proper exposure is f/16 at 1/125s. With ISO 200 film, use f/16 at 1/250s.
This simple rule eliminates much of the guesswork from determining exposure and provides a handy starting point.
The sunny 16 rule is especially useful when shooting film without a light meter or outdoors in very bright light when your camera’s meter may struggle.
It’s a great technique to have under your belt whether you’re just starting your photography journey or have been shooting for years.
A Brief History of the Sunny 16 Rule
The sunny 16 rule has its origins in the film photography era and was a handy way for photographers to estimate exposure outdoors on a sunny day. It is based on the amount of light typically available on a bright, sunny day.
The original rule was calculated for use with ISO 100 print film, which was widely available at the time.
In the film days before built-in light meters, photographers had to rely on hand-held light meters or rules of thumb like sunny 16 to determine exposure. While today’s digital cameras have sophisticated built-in metering systems, the sunny 16 rule remains a useful technique, especially for film photographers or photographing tricky high-contrast scenes.
How the Sunny 16 Rule Works
The sunny 16 rule provides a starting point or baseline shutter speed and aperture combination for proper exposure on a sunny day. It is based on the following constants:
- ISO 100 film
- Sunny, cloudless conditions
- Incident light exposure meter reading of f/16
Incident light meters measure the amount of light falling on the subject rather than the reflected light. This gives a better sense of the total available light to calculate exposure.
Based on these constants, the sunny 16 rule is:
Aperture: f/16 Shutter speed: Reciprocal of ISO (1/ISO)
So for ISO 100 film, the shutter speed would be 1/125s. For ISO 400 film, it would be 1/500s.
This combination of aperture and shutter speed will give you the correct exposure on a sunny day with ISO 100 film.
You can then adjust from there based on the ISO film you’re using or changes in lighting conditions.
Using the Sunny 16 Rule with Different ISOs
The sunny 16 rule can easily be adapted when using film speeds other than ISO 100. Simply set your aperture to f/16 and choose a shutter speed equal to the reciprocal of your ISO.
For example:
- ISO 100 film: f/16 at 1/125s
- ISO 200 film: f/16 at 1/250s
- ISO 400 film: f/16 at 1/500s
Using this guideline, you can quickly calculate the proper sunny 16 exposure for any film speed without having to use a meter.
Adjusting For Variable Light Conditions
While the sunny 16 rule provides a baseline exposure, you’ll need to adjust your settings based on the actual lighting conditions.
Here are some common situations and how to modify the sunny 16 rule:
Overcast or Heavy Cloud Cover
- Open up the aperture to f/5.6
- Keep ISO and shutter speed the same
Partly Cloudy
- Split the difference – Use f/8 – f/11 split aperture
- Keep ISO and shutter speed the same
Open Shade
- Open the aperture up one stop to f/11
- Keep ISO and shutter speed the same
Dawn or Dusk Light
- Open the aperture up to f/4
- Keep ISO and shutter the same
The key is to visually assess the ambient light and then open or close the aperture while keeping the determined shutter speed for the ISO. It just takes some trial and error and experience to learn how to properly adjust.
Using the Sunny 16 Rule for Digital Photography
While designed for film photography, the sunny 16 rule can also easily be applied in digital photography.
Simply set your camera to the base ISO (usually 100 or 200) and aperture to f/16. Then set your shutter speed to the reciprocal of the ISO.
For example, with ISO 200:
- Aperture: f/16
- Shutter: 1/250s
You can then make adjustments to the aperture or shutter speed depending on the light. The sunny 16 rule gives you a starting point for exposure without needing to use your camera’s meter.
Sunny 16 Rule Cheat Sheet
Here is a handy cheat sheet for using the sunny 16 rule:
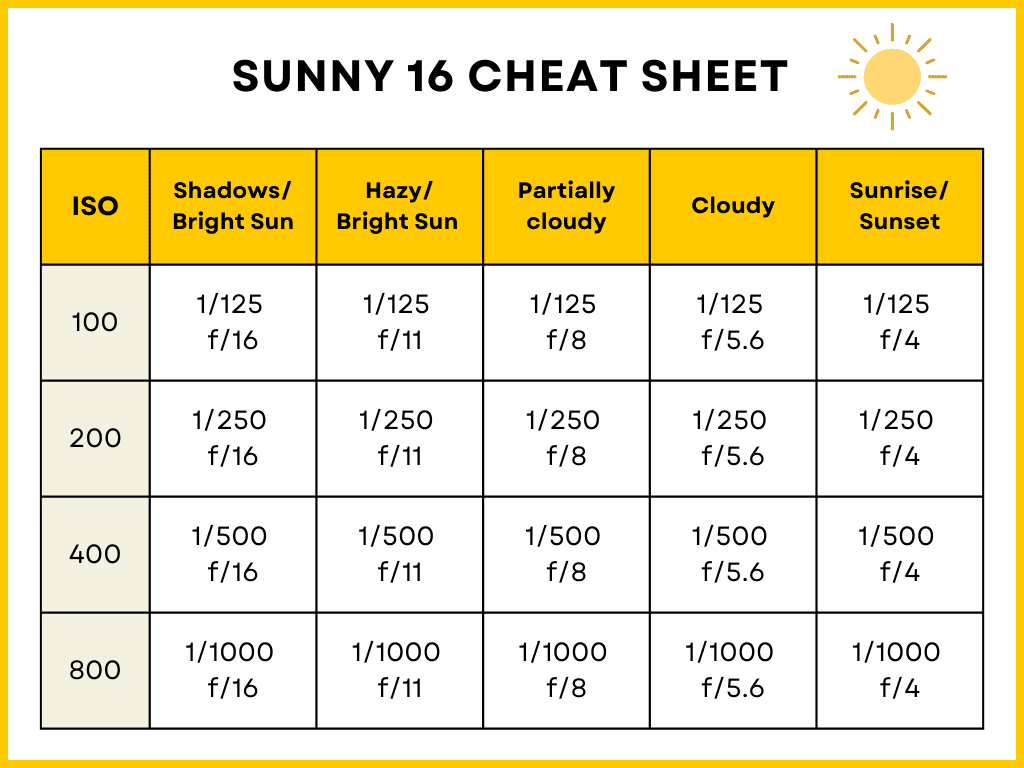
Print out this cheat sheet and keep it in your camera bag for quick reference when shooting in sunny conditions.
Common Situations for Using Sunny 16
Here are some scenarios where applying the sunny 16 rule comes in handy:
Shooting Film Without a Light Meter
For film photographers without a dedicated light meter, the sunny 16 rule provides a simple way to estimate proper exposure in sunny conditions. Just set your aperture and shutter speed according to the ISO and start shooting.
Bright, Backlit Scenes
The sunny 16 rule can help when photographing subjects with very bright or harsh backlighting. For example, when shooting portraits outdoors around noon. Your camera’s meter may underexpose the scene, but sunny 16 will give you the right starting point.
High Contrast Scenes
When photographing high contrast scenes with bright highlights and dark shadows – like a landscape on a clear day – sunny 16 eliminates the need to take meter readings from multiple points.
Consistent Outdoor Lighting
If shooting outdoors under relatively consistent sunny lighting, like at a sporting event or summer wedding, sunny 16 takes out the variable of needing to constantly re-meter.
Calibrating Your Camera’s Light Meter
Use the sunny 16 rule as a calibration tool to test the accuracy of your particular camera’s meter compared to the actual exposure.
Limitations of the Sunny 16 Rule
While an indispensable technique, the sunny 16 rule does have its limitations:
- As an estimate, it may not give you the exact correct exposure in every sunny situation. Some refinement and bracketing are often needed.
- It assumes fairly bright, even lighting. So it works best around noon and may need adjusting early/late in the day.
- There is some variation in what is considered a “sunny” day. This can impact whether f/16 gives the precise correct exposure.
- It works best for front lit subjects with non-reflective surfaces. Reflective or backlit subjects will require exposure compensation.
- As with any light meter, very dark or light colored subjects may skew the exposure. Some testing and experience are required to understand how much exposure compensation is needed.
- The rule can break down in exceptional situations like snow or desert environments where reflected light requires reducing exposure.
While the sunny 16 rule isn’t 100% foolproof, it gets you close enough to achieve a usable exposure in most sunny situations, giving you much more consistent results than guessing.
Who Should Use the Sunny 16 Rule?
If you’re just starting out in photography, especially shooting with film, make it a point to learn the sunny 16 rule. Understanding this basic technique will accelerate your learning of exposure and prevent a lot of wasted shots.
For veteran photographers, sunny 16 is a handy tool to keep in your back pocket when shooting outdoors in very bright sunlight. Use it anytime you need a quick starting exposure without metering.
The sunny 16 rule is equally useful for both digital and analog photographers who need a fast way to estimate exposure in full sun. Whether you’re shooting with a DSLR or rangefinder, keep this simple rule in mind when working in bright conditions.
Tips for Mastering the Sunny 16 Rule
Learning to apply the sunny 16 rule proficiently takes some practice.
Here are some tips:
- Memorize the basic sunny 16 formula so you can recall and implement it quickly.
- Refer to the cheat sheet when first starting out. With experience, you’ll know the settings by heart.
- Always take a test shot and check your histogram when possible. This will help reinforce proper exposure.
- Bracket your shots to hedge your bets when starting with sunny 16. You may need minor tweaks.
- Gain experience using sunny 16 across different sunny lighting scenarios to understand how to adjust it.
- Learn when NOT to use sunny 16, like for snowscapes or in open shade. Trust your eyes.
- Have confidence in the formula for frontlit subjects on bright, sunny days around midday. This is when sunny 16 shines.
Mastering the art of estimating exposure takes practice. Be patient, trust the sunny 16 rule fundamentals, and gain hands-on experience across different lighting situations. Soon it will become second nature.
In summary, the sunny 16 rule is one of the most useful techniques in a photographer’s toolkit.
By providing a simple standard exposure baseline for bright, sunny days, it makes it easy to maximize quality and consistency in your shots. Mastering this fundamental rule will make you a better outdoor photographer.
FAQs: Sunny 16 Rule
The sunny 16 rule is a technique to estimate correct exposure settings on bright, sunny days. For ISO 100 film, it sets the aperture to f/16 and the shutter speed to the reciprocal of the ISO (1/100 for ISO 100). It provides a starting point that you can then refine based on lighting conditions.
Use the sunny 16 rule when shooting in bright sun, especially around midday. It eliminates metering and provides a baseline exposure setting. It’s particularly handy when shooting film without a light meter.
Yes, the sunny 16 rule can be used with digital cameras too. Just set your ISO to the base (usually 100 or 200) and then choose f/16 aperture and 1/ISO shutter speed. Adjust settings as needed from there.
Open up your aperture by one or two stops if it’s overcast or you’re in open shade. For example, instead of f/16 choose f/11 or f/8. Keep the shutter speed based on ISO. For partly cloudy, use f/11-f/13 as a midpoint.
It assumes bright sun roughly equivalent to f/16 incident light exposure. This was the industry standard brightness measurement for calculating exposure in the film days.
It provides a very close estimate but may need minor adjustments depending on lighting variables. Bracketing shots around the sunny 16 settings is recommended to ensure proper exposure.
The rule works best in direct sun but can be adapted on partly cloudy days by opening up aperture or slightly increasing ISO. It will generally give you an accurate starting point to refine.

