The key to taking great headshots is all about the lighting. With the right lighting setup, you can create professional, flattering portraits that make your subjects look their very best. In this article, we’ll cover some of the most common and effective lighting setups for headshots so you can learn how to beautifully photograph your clients, models or talent.
The most important thing to keep in mind when lighting headshots is that the light should be soft and diffuse. Hard, direct light creates harsh shadows which is unflattering for portraits. Soft light wraps beautifully around the contours of the face to make skin look smooth and flawless.
There are two main types of light you can use for headshots – continuous light and strobe lighting. Continuous lights stay on during the entire shoot while strobes only flash for an instant when you take the photo. Both produce great results but offer different benefits. We’ll cover setups using both options so you can choose what works best for your needs and budget.
One Light Setups
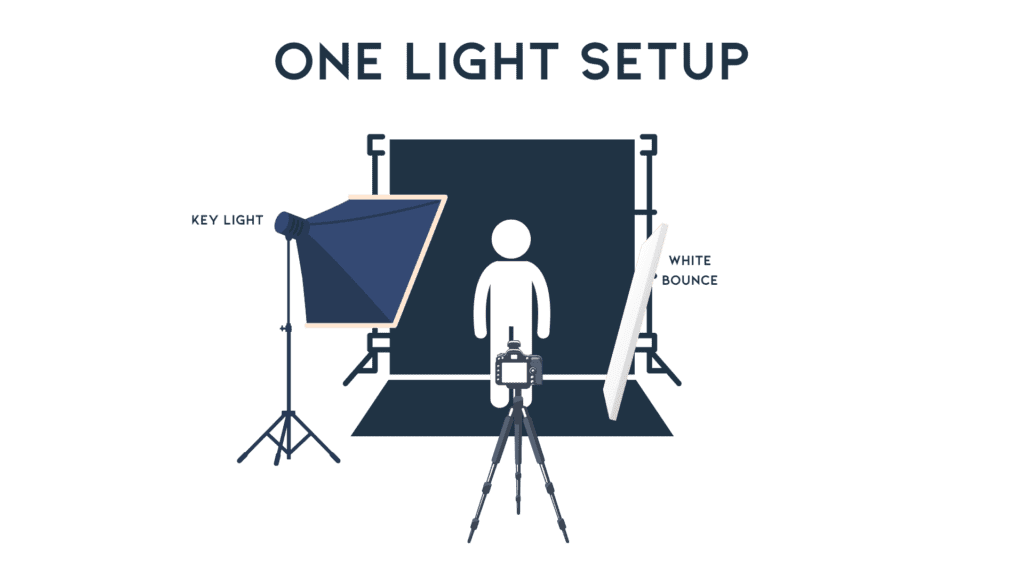
Let’s start with some simple, one light setups. These are easy to set up and still provide beautiful lighting for headshots. The most versatile and commonly used light source for headshots is a softbox. Softboxes create a soft, wraparound light that is very flattering.
Here are some options for positioning a single softbox:
Loop Lighting
One of the most common portrait lighting patterns is loop lighting. To achieve this look, position a softbox directly in front of the subject and slightly above eye level angled down towards the face. This creates a loop of shadow along the side of the nose on the less illuminated side of the face. Loop lighting is flattering for most faces.
Rembrandt Lighting
Similar to loop lighting, Rembrandt lighting has the key light in front of and above the subject. But it is more dramatic with deeper shadows. Position the softbox higher above the subject so the triangle of light on the cheek is smaller and the shadow under the nose more pronounced. Rembrandt lighting is bold and dramatic.
Butterfly Lighting
For butterfly lighting, place the softbox directly in front of and above the subject’s face, aiming down towards them. This creates a butterfly shaped shadow under the nose and highlights the cheeks and eyes. Butterfly lighting is very flattering for women’s portraits in particular.
Split Lighting
To achieve split lighting, position the softbox high and off to one side of the subject so half their face is illuminated and half is in shadow. Be careful to keep ample fill light in the shadowed side to avoid overly dark shadows. Split lighting creates dramatic contrast.
Natural Light
If shooting with continuous lights or outdoors, you can create beautiful headshots using natural light.

Use a reflector to bounce light back into any shadows. Pay attention to the direction and quality of light throughout the day for best results. Early morning or late afternoon light is often most flattering for portraits.
Two Light Setups
While a single light can create beautiful headshots, a second light allows more control over shadows and highlights.
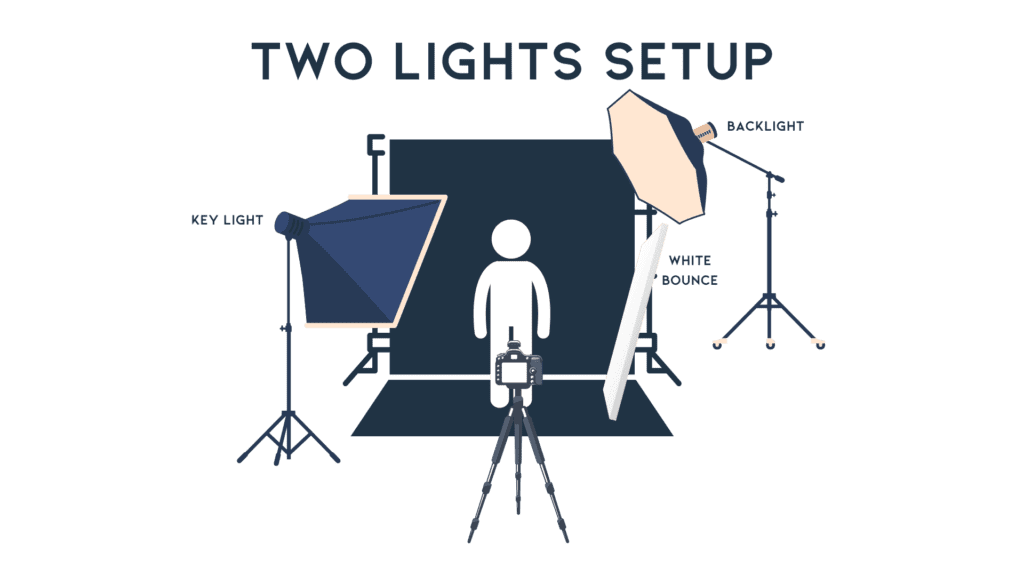
Fill Light
Add a fill light opposite your key light to fill in the shadows and illuminate the side of the face that would otherwise be in shadow. This creates more flattering light but still retains some shaping from the key light. Use a reflector or lower powered light source for the fill.
Hair/Rim Light
Position a second light behind the subject or on the opposite side of the key light to create a rim or edge light. This helps separate the subject from the background and adds a stylish rim of light around their head or along the contours of their face.
Background Light
Lighting the background separately from the subject allows you to achieve a brighter, cleaner background. Use a couple small flash heads or LED panels to illuminate the area behind the subject. This makes them stand out more from the background.
Clamshell Lighting
Position two softboxes or umbrellas – one on each side of the camera so the light wraps around onto both sides of the face. This creates even, flattering light with few shadows. It is more flat and low contrast but the soft light is very appealing for many subjects.
Continuous vs Strobe Light
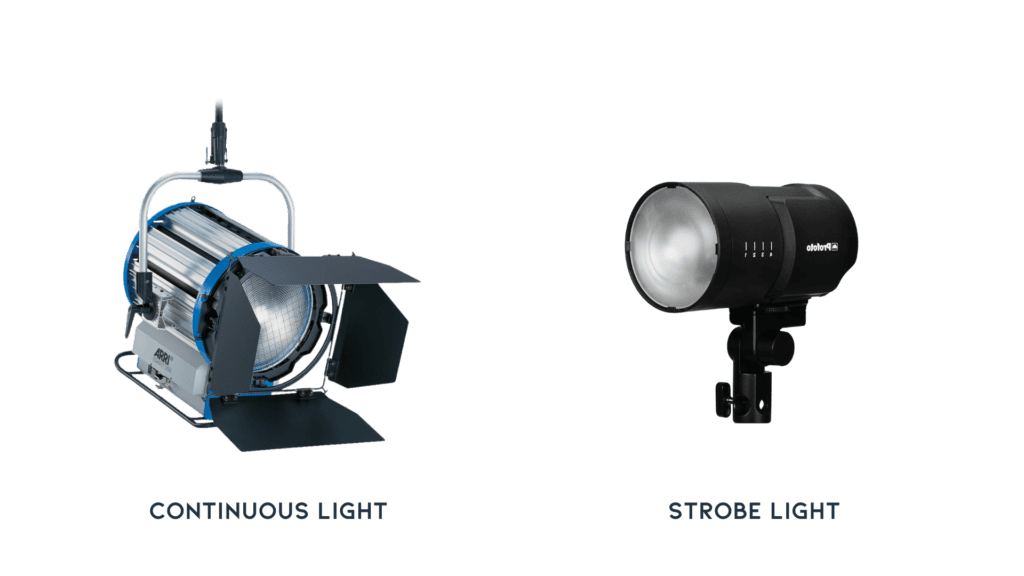
As mentioned previously, there are benefits to both strobe and continuous lighting. Strobes offer more power and flexibility for studio setups while continuous lights offer portability and convenience.
Some benefits of strobe lighting:
- Very high power output to overpower sunlight or light large scenes
- Freeze fast motion since duration of flash is very brief
- Adjust power up or down easily
- Consistent color temperature shot to shot
- Recycle quickly between shots
- Create stylish motion blur by dragging the shutter
Benefits of continuous lighting:
- What you see is what you get – constant light to preview the lighting effect
- Shoot video or live events
- Easy to adjust lighting by moving the lights vs adjusting power
- Lightweight and highly portable
- Lower upfront costs for basic kits
- Very little learning curve to get started
Either can produce excellent results. It comes down to the type of shooting you do and your budget. Many photographers will use a mix of both in their kit for maximum flexibility.
Accessories to Enhance Your Lighting
Here are some accessories that can help improve the quality of light and add versatility to your headshot lighting.
Reflectors bounce light back into the shadows caused by your key light. A collapsible circular reflector is very handy for portraits.
Flags or gobos block or shape the light. Use to prevent lens flare or keep light off the background.
Barn Doors attach to the front of lights to control the spread and direction of light. Help prevent spill onto the background.
Umbrellas are an affordable light modifier, great for softening the light from flash heads. Shoot-through or reflective umbrellas offer different qualities of light.
Grids or snoots narrow and focus the beam of light. Grids attach to softboxes or beauty dishes. Snoots attach directly to the flash head.
Gels tint your lights different colors for creative effect. Full CTB (blue) gels are essential for balancing flash with daylight.
Backdrops provide a clean, solid colored background, seamless paper being very common. Or use canvas, muslin, vinyl, etc. for different textures.
Reflective Surfaces position Reflectors, boards covered in tin foil, white foam core, mirrors, etc. strategically to redirect existing light towards your subject for fill light.
Getting comfortable with lighting will take some practice but is extremely rewarding. Don’t be afraid to experiment with different lighting patterns, positions, heights and modifiers until you find looks that you love.
Pay attention to how different lighting creates different moods. Aim to light the features of each subject in a way that is natural, flattering and fits their personality. With a little experience, you’ll be lighting professional headshots with beautiful, polished lighting every time.
FAQ – Headshots Lighting
A simple and effective setup for corporate headshots is a two-light setup. Use one main light source, preferably a softbox or umbrella, positioned diagonally to the subject. A second light, the rim light, can be used to create additional depth and separation from the white background.
When using natural light for headshots, try to put your subject in a location where the light comes in soft and diffused, such as under the shade of a tree or building. Try to avoid harsh midday sunlight that can create unflattering shadows. Use reflectors if necessary, to bounce back light onto your subject.
Studio equipment for actor headshots often includes a main light, a hair light, an accent light for adding depth of field, and a background light if necessary. More advanced setups might also incorporate a ring light for catchlights, along with modifiers like softboxes, umbrellas, and scrims.
Yes, a ring light can be a great tool for headshot lighting. It creates even, diffused light that can minimize shadows and bring out the subject’s best features. It also produces distinctive round catchlights in the eyes.
Yes, for professional headshots for platforms like Linkedin, use a main key light to light your subject, an accent or rim light for depth, and make sure to use correctly placed catchlights to add life to the subject’s eyes.
Definitely. Even a simple one or 2 light setup using a speedlight can yield excellent results. Remember, the key to good portrait lighting is understanding how the light shapes and defines your subject. Experiment with positioning and intensity to get the best results.
Most professional headshot photographers use a variety of setups depending on the situation. A common setup is a three-light situation including a main light source, a fill light, and a hair light. However, even one light source properly placed can create an effective headshot.
Light from the bottom, also known as ‘monster lighting’, is typically avoided in headshot photography as it creates unflattering and unnatural shadows. The main light source is typically positioned either level with or slightly above the subject’s face.
Yes, a simple setup can work well for studio headshots. At its simplest, this could just be a single key light. More complex arrangements can add a fill light, a back light, or even extra lights for the background or to highlight specific features.
You can always add a comment on the photographer’s blog, social media pages, or any platform where they interact with their followers. Most professional photographers are eager to share their knowledge and help others improve their lighting skills.