Are you tired of photos that are too bright, too dark, or just not quite right? The exposure triangle is a fundamental concept in photography that can help you take better pictures.
It consists of aperture, shutter speed, and ISO, which work together to produce a properly exposed photo. In this article, we’ll break down each component of the exposure triangle and show you how to balance them for great results.
By the end, you’ll have the knowledge and confidence to take stunning photos in any situation.
Defining the Exposure Triangle
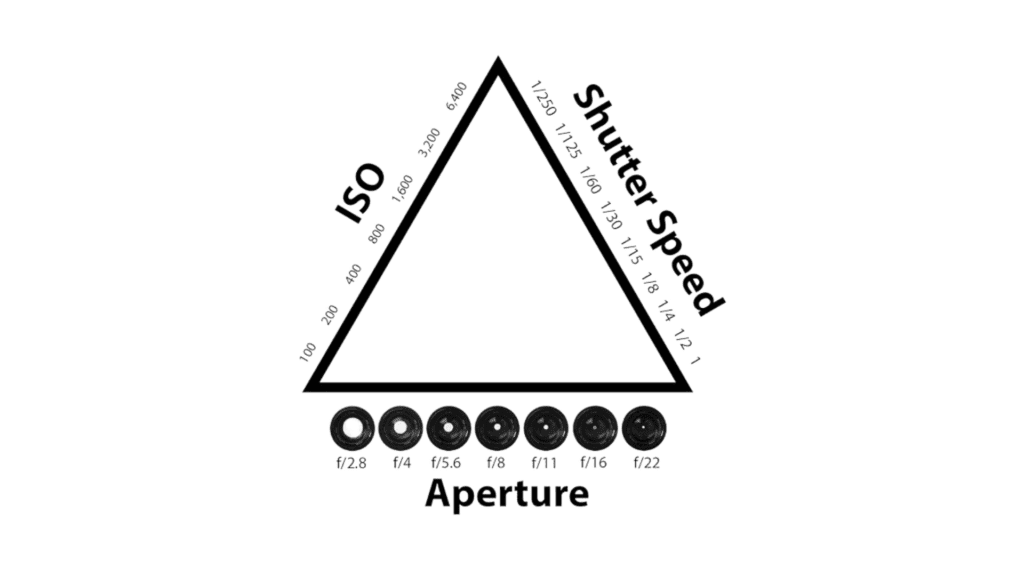
The exposure triangle consists of aperture, shutter speed, and ISO. These three elements work together to control the amount of light that hits your camera’s sensor.
Aperture
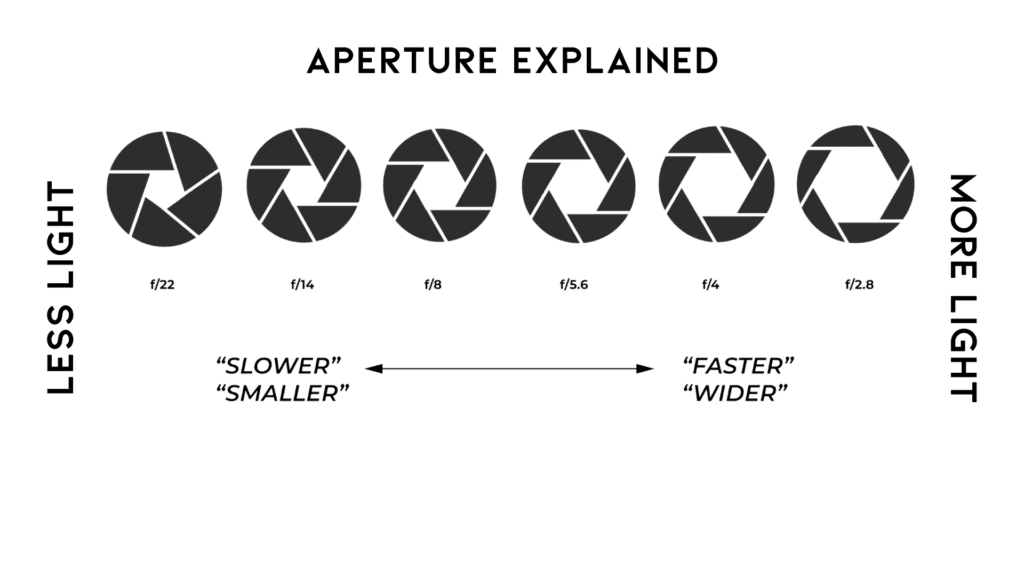
Aperture is the opening in a camera lens that allows light to pass through to the sensor. It works like the pupil of an eye, widening or narrowing to control the amount of light entering.
A wider aperture (lower f-number like f/2.8) lets in more light and creates a shallow depth of field, blurring the background. A narrower aperture (higher f-number like f/16) lets in less light but keeps more of the scene in focus.
Aperture size directly impacts exposure. Opening up the aperture by selecting a lower f-stop number doubles the amount of light hitting the sensor. Closing down the aperture by choosing a higher f-stop number halves the light.
Shutter Speed
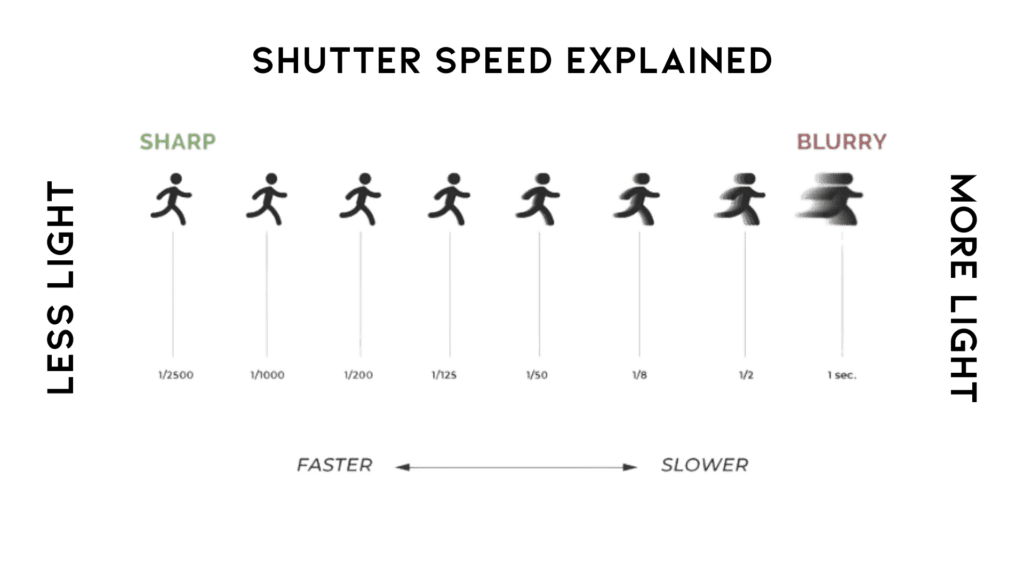
While aperture controls the amount of light entering the lens, shutter speed determines how long the camera’s sensor is exposed to that light. Measured in fractions of a second, like 1/250 or 1/1000, shutter speed is a crucial setting in the exposure triangle.
Faster shutter speeds, such as 1/1000, allow less light to reach the sensor, resulting in a darker exposure. They also freeze motion, making them ideal for capturing fast-moving subjects like birds in flight or athletes in action.
Conversely, slower shutter speeds, like 1/30 or 1 second, let in more light for a brighter exposure but can introduce motion blur if the subject or camera moves during the exposure.
Shutter speed is one of the three variables you can adjust to achieve the desired exposure and creative effect in your photos. By understanding how it works in relation to aperture and ISO, you can make informed decisions about your camera settings.
For example, if you’re shooting in low light and need a faster shutter speed to avoid blur, you may need to open up your aperture or increase your ISO to compensate. Experimenting with different shutter speeds can also lead to interesting creative effects, like the silky smooth appearance of flowing water or the trails of light created by moving cars at night.
ISO
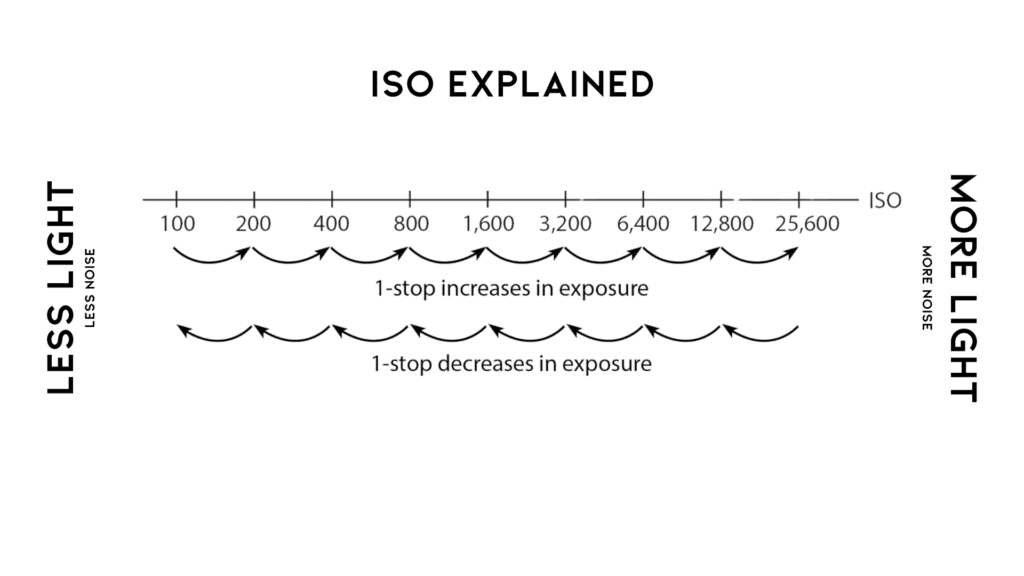
ISO is the third component of the exposure triangle. It measures the sensitivity of your camera’s sensor to light. A higher ISO setting makes the sensor more sensitive, allowing it to capture images in low light conditions without needing a slower shutter speed or wider aperture.
However, increasing the ISO too much can introduce digital noise, which reduces image quality.
Each doubling of the ISO value, such as going from ISO 100 to 200, increases the sensor’s sensitivity by one stop. This means you can use a shutter speed twice as fast or an aperture one stop smaller while maintaining the same exposure.
The Practical Use of the Exposure Triangle
Balancing light and content is key to getting the right exposure in your photos. By adjusting aperture, shutter speed, and ISO, you can capture the image you want.
Balancing Light and Content
Balancing light and content is a fundamental skill in photography. The exposure triangle helps you nail the perfect exposure while capturing the desired depth of field and motion. Open up the aperture to let in more light and blur the background.
Or use a faster shutter speed to freeze action but reduce the light hitting the camera’s sensor. Bump up the ISO in dim conditions, but watch out for grainy images.
Mastering the exposure triangle takes practice. But it enables you to get creative with light, focus and movement in your shots. Soon you’ll be switching between aperture, shutter speed and ISO settings without a second thought.
Adjustments for Desired Results
Photographers use the exposure triangle to capture their desired results. They tweak aperture, shutter speed, and ISO to get the perfect shot. Opening up the aperture allows more light in but reduces depth of field.
Faster shutter speeds freeze motion but let in less light. Higher ISOs brighten images but introduce more noise.
Mastering the exposure triangle takes practice. Start by setting your camera to manual mode. Pick a subject and try different combinations of settings. See how each adjustment impacts the final image.
With experience, you’ll learn to balance the triangle intuitively. Soon you’ll be capturing stunning photos in any lighting condition.
Here are the entities/concepts used in the above content and their respective hyponyms:
1. triangle (entity) -hyponym> shape.
2. adjustments (entity) -hyponym> changes.
3. aperture (entity) -hyponym> f-stop.
4. shutter speed (entity) -hyponym> exposure time.
The Components of the Exposure Triangle
The three key settings that make up the exposure triangle are shutter speed, aperture, and ISO. Shutter speed controls how long the camera’s sensor is exposed to light, aperture adjusts the size of the lens opening to let in more or less light, and ISO determines the sensor’s sensitivity to light.
Shutter Speed: Balancing Exposure and Detail
Shutter speed controls how long the camera’s shutter stays open, letting light reach the digital sensor or film. A fast shutter speed like 1/1000 sec reduces the amount of light and captures less motion blur, giving a crisp image.

But it may result in underexposure if the scene is darker. A slow shutter speed like 1/30 sec allows more light in and shows more motion blur, which can be used creatively for things like silky waterfalls or light trails.

However, it risks overexposure in bright scenes and may need a tripod to avoid camera shake.
Finding the right shutter speed is about balancing the exposure with the desired amount of motion blur or sharpness. In low light, a slower shutter may be needed to get enough exposure, while action shots usually call for a faster shutter to freeze the subject.
Aperture: Controlling Light and Depth of Field
Aperture is a crucial element of the exposure triangle. It controls the amount of light entering the camera through the lens opening. Aperture size is measured in f-stops, with lower f-numbers indicating wider apertures and higher f-numbers representing smaller apertures.
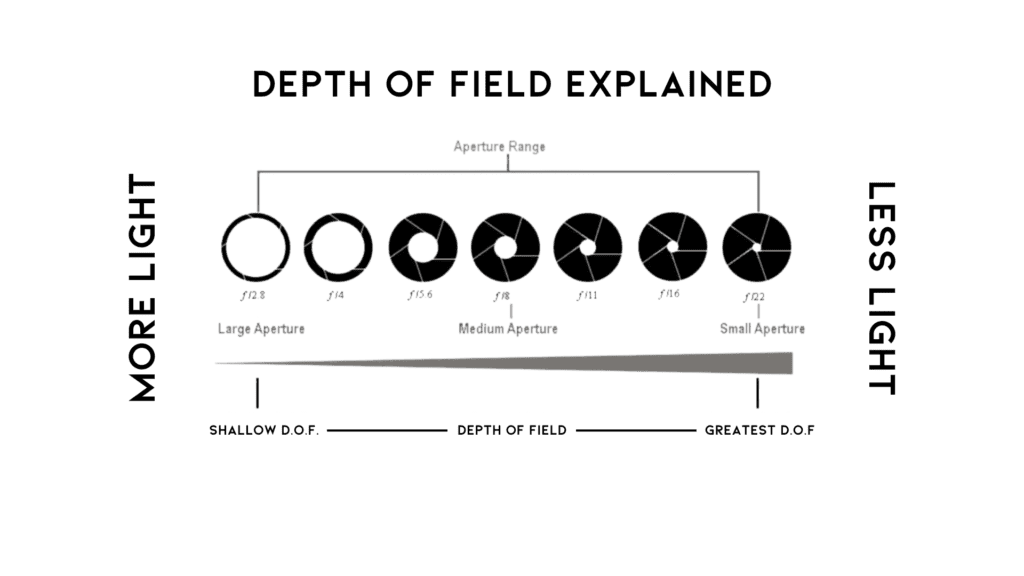
Aperture also influences depth of field, which is the area of the image that appears sharp and in focus. Wide apertures like f/1.4 or f/2.8 create a shallow depth of field, making the subject stand out against a blurred background.
This effect is often used in portrait photography. Conversely, small apertures like f/11 or f/16 provide a deep depth of field, keeping both the foreground and background in focus.
ISO: Adjusting Based on Available Light
ISO measures your camera sensor’s sensitivity to light. The higher the ISO number, the more sensitive it is to light. This allows you to capture images in low-light environments without using a flash.
However, increasing the ISO also amplifies the sensor’s signal, which can introduce digital noise and reduce image quality.
ISO values typically range from 100 to 6400 or higher on modern digital cameras. ISO 100 is the least sensitive setting, requiring more light for proper exposure. As you increase the ISO to 200, 400, 800, and beyond, the sensor becomes more sensitive to light, allowing faster shutter speeds or smaller apertures.
Each doubling of the ISO value effectively doubles the sensor’s sensitivity, providing a one-stop increase in exposure. Understanding how ISO affects exposure is crucial for achieving the desired balance in the exposure triangle.
The Role of Light in the Exposure Triangle
Light plays a crucial role in the exposure triangle. The amount of light entering the camera determines how you adjust the aperture, shutter speed, and ISO. More light requires a smaller aperture, faster shutter speed, or lower ISO to avoid overexposure.
Less light needs a wider aperture, slower shutter speed, or higher ISO to properly expose the image.
The camera’s light meter measures the luminance in the scene. It helps you balance the settings to get the correct exposure. When the light is low, like at dusk or indoors, you may need to use a wider aperture to let in more light, slow down the shutter to increase exposure time, or raise the ISO to make the sensor more sensitive to light.
On bright sunny days, you’ll do the opposite, using a smaller aperture, faster shutter, or lower ISO to avoid too much light hitting the image sensor and overexposing the photo.
Understanding Aperture in Depth
Let’s dig deep into aperture and its effects on your photos. Aperture is the opening in your camera lens that lets light hit the sensor.
The Impact on Depth of Field
Aperture has a significant impact on depth of field in photography. A wide aperture like f/2.8 creates a shallow depth of field, blurring the background and drawing attention to the subject.

On the flip side, a narrow gap like f/16 produces a deep depth of field, keeping both the foreground and background in focus.

Photographers use the aperture setting to control how much of the scene appears sharp. Portrait shooters often use a broad opening to isolate their subject against a creamy backdrop.
How Aperture Affects Exposure
Aperture controls the amount of light entering the camera through the lens. A wider aperture (lower f-number) lets more light in, resulting in a brighter exposure. Conversely, a smaller aperture (higher f-number) allows less light to reach the sensor, leading to a darker exposure.
The size of the aperture opening is measured in f-stops. Each full f-stop change either doubles or halves the quantity of light passing through the lens diaphragm. For example, going from f/4 to f/5.6 cuts the light in half, while moving from f/8 to f/5.6 doubles the light.
Photographers must adjust the aperture size to achieve the desired exposure level for their images.
Delving into Shutter Speed
Shutter speed controls how long the camera sensor is exposed to light. A fast shutter speed can freeze action, while a slow shutter speed can create motion blur.
The Effect on Motion Blur
Shutter speed controls motion blur in photographs. A fast shutter speed freezes action, while a slow shutter speed blurs moving objects. The camera’s shutter opens and closes quickly at high speeds, letting in less light and capturing sharp details of fast-moving subjects like birds in flight or athletes sprinting.
Conversely, the shutter stays open longer at slow speeds, allowing more light and resulting in motion blur for anything moving, such as waterfalls or car headlights streaking by at night.
Creatively using shutter speed adds dynamic effects to images. Experiment with different speeds to capture or freeze motion depending on the desired result. For example, a slow 1/15th of a second shutter speed blurs a person walking, giving a sense of movement, while a fast 1/1000th of a second crisply freezes a hummingbird’s flapping wings mid-air.
Shutter Speed’s Influence on Exposure
Selecting a faster shutter speed reduces the amount of time the camera sensor is exposed to light. This results in less light reaching the sensor, leading to a darker exposure. Conversely, slower shutter speeds allow more light to reach the sensor, resulting in a brighter exposure.
To maintain a balanced exposure, adjustments to aperture or ISO may be necessary when changing shutter speed. Opening up the aperture or increasing the ISO can compensate for the reduced light from a faster shutter speed.
Similarly, closing down the aperture or lowering the ISO can balance the increased light from a slower shutter speed. Understanding how shutter speed affects exposure is key to mastering the exposure triangle and capturing well-exposed photographs.
Exploring ISO
ISO is the camera’s sensitivity to light. Increasing ISO makes your image sensor more responsive to light, allowing you to shoot in darker environments.
ISO and Image Quality
ISO directly impacts image quality. Higher ISO values make the camera sensor more sensitive to light, allowing you to capture images in low-light situations without using flash. But there’s a trade-off – as you increase the ISO, image noise or grain also increases, reducing overall image quality.
So it’s important to find the right balance, using the lowest ISO possible for the lighting conditions to maintain the best image quality while still getting a proper exposure.
Most modern digital cameras perform well at ISOs up to 1600 or even 3200. Newer high-end cameras can shoot at even higher ISOs with minimal noise. But for the clearest, sharpest images, it’s best to keep the ISO as low as you can.
How ISO Impacts Exposure
ISO directly controls the camera’s sensitivity to light. A higher ISO number means the sensor needs less light to properly expose the image. Doubling the ISO value, such as going from 100 to 200, doubles the sensor’s sensitivity and halves the amount of light needed for a good exposure.
ISO works together with aperture and shutter speed in the exposure triangle. To maintain the same exposure, you can increase ISO while using a faster shutter speed or smaller aperture opening.
However, using very high ISO values can introduce digital noise, reducing image quality. So it’s best to keep ISO as low as possible while still getting the desired exposure.
Achieving Balance in the Exposure Triangle
Balancing the exposure triangle takes practice. Aperture, shutter speed, and ISO work together. Each setting affects the amount of light entering the camera. Adjust one setting, and you need to change the others to maintain the correct exposure.
Start with the aperture or shutter speed that gives the desired creative effect. Then adjust the other two settings to get a proper exposure. Check the histogram and image preview.
Make small changes until you find the right balance for the scene. With experience, you’ll learn to quickly set the camera for any lighting situation.
Conclusion
Mastering the exposure triangle takes practice. Keep experimenting with different aperture, shutter speed and ISO combinations. Soon you’ll be able to quickly adjust these settings to capture the perfect exposure in any lighting situation.
The exposure triangle is a fundamental concept every photographer should understand. Happy shooting!
FAQ – photography exposure triangle
The exposure triangle works by combining three main components: aperture, shutter speed, and ISO, to create a balance that affects the final exposure of an image. Understanding how to adjust these settings in relation to each other helps you achieve the perfect exposure every time.
The photography triangle, also known as the exposure triangle, is important because it is the foundation for understanding how to properly expose photos. It involves balancing aperture, shutter speed, and ISO to control how light or dark an image is.
Yes, an exposure triangle chart can serve as a cheat sheet or a beginner’s guide to help you understand the relationship between aperture, shutter speed, and ISO. It visually represents how adjusting one setting necessitates changes in the others to maintain the same exposure level.
The exposure triangle is explained to beginners by breaking down its three components. Aperture controls the diameter of the lens opening, affecting depth of field. Shutter speed dictates the length of time the sensor is exposed to light. ISO measures the sensor’s sensitivity to light. Balancing these elements is key to achieving desired exposure.
To balance your exposure, you need to adjust the aperture (to control the amount of light entering the camera), shutter speed (to control the duration of light exposure), and ISO (to control the camera sensor’s sensitivity to light). Understanding how to synchronize these settings is crucial for exposure photography.
To improve photo quality, you may need to increase the ISO for better sensitivity in low light conditions without making your image underexposed. Alternatively, adjusting the aperture to a wider setting allows more light to hit the sensor, which is useful in dim environments or to achieve a shallow depth of field.
The exposure triangle definition refers to the three key elements of photography that work together to create an image’s exposure: aperture (the lens opening size), shutter speed (the amount of time the camera’s sensor is exposed to light), and ISO (the sensor’s sensitivity to light). These elements are interconnected, and adjusting one necessitates changes in the others.
Understanding the exposure triangle can help you with post-processing by giving you a deeper insight into how your camera settings affected the image. This knowledge allows you to make more informed adjustments in Lightroom and Photoshop, such as correcting exposure or enhancing dynamic range, for a more polished final product.