In this guide, we will be looking at the foundation of color theory. We will go through primary colors, hue, saturation, and lightness. The goal of this article is to give you a very solid foundation when it comes to color before we dive right into color theory. We will be looking at the psychology of color and the best practices to capture the best photograph possible every single time.
There is a lot to cover so let’s dive right into it!
How do you perceive color?

It is important to notice that when it comes to color, we perceive rather than see. This happens because the part of our body that decides what we see is our human brain.
Let me give you an example here.

I have a red toy car. When the light hits the surface of the red car, all the visible light spectrum is absorbed by the color of the car except red, which is reflected off.

The light that is reflected off travels into our eye, goes through the lens of the eye, the pupil, and eventually arrives at the retina, which is at the back of our eyes.
The retina has light receptors and color receptors and converts these signals into electrical impulses. These impulses are then sent to our brain and it tells us that the car that we have seen is red.
Why is this important? This is important because ultimately our brain has the final interpretation of the color that we see and the emotions that are associated with it.

Some emotions are intrinsic to our brain, whereas some of the emotions are learned via our meaningful life experiences. This is exactly why different colors trigger different emotions and feelings in each of us.
Color Wheels
Now that you have a better understanding of why you see the color you see, the next step is to introduce the color wheel.
There are 3 different types of color wheels, the RYB color wheel, the RGB color wheel, and the CMYK color wheel. RYB stands for red, yellow, and blue. RGB stands for red, green, and blue, and CMYK stands for cyan, magenta and yellow.
Let’s start with the RYB color wheel.

RYB Color wheels are typically used by painters and it is a subtractive color model used in art and applied design. In this model, the primary colors are red, yellow, and blue.
Instead, RGB color wheels are typically used on color monitors, such as the monitor you are looking at right now.

CMY colors are typically used by printers. For example, the photography prints that you have at home. When you add Cyan, Magenta and Yellow together, you get black ink (K), which is what you see.

Primary, Secondary and Tertiary Colors
Now that we have a basic understanding of the differences between the color wheels, we will take a deeper look at the color wheels themselves.
For demonstration purposes, I will be using a RYB Color wheel that you can see below. When it comes to the RYB color wheel, the primary colors are Red, Yellow and Blue.
When I say Primary Colors, I mean the colors that exist on their own and don’t need any other color to be made. So, as I mentioned above, in this case for the RYB Color wheel, they are Red, Yellow and Blue.

Secondary colors, on the other hand, are colors created by mixing up primary colors together. So, in the case of the RYB color wheel, they are Violet, Orange and Green.

Then we have Tertiary Colors, which are created by mixing up a primary and a secondary color together.
In this specific case, they are the colors between the primary and secondary colors in the wheel.

Color wheels are something that we will be using throughout this whole article, especially when we will be talking about the Color Harmony Rule.
Hue, Saturation and Lightness (HSL)
Now that we have talked about primary, secondary, and tertiary colors, I would like to introduce you to hue, saturation, and lightness (brightness), which together are also called HSL, and I think this is a concept that will help you understand colors even more.

Hue, saturation and brightness, or simply HSL are ways to create color variants from the primary, secondary, and tertiary colors, which we have explained before.
There is also another way to create color variants, which is by using tints, shades and tones. These are traditionally used by painters, in a way where they add bits of white paint, black paint and gray paint to a single color in order to create multiple variants of it.
Since most of us will be using this color knowledge mostly for digital photography rather than painting, we will be focusing on HSL only since it is more relevant to it.
Let’s start with hue.
Hue refers to the color we see. The Hue is one of the six Primary and Secondary colors. In other words, the underlying color of a mixture you’re looking at is either Yellow, Orange, Red, Violet, Blue or Green.
Let’s move on to saturation.
Color saturation refers to the intensity of color in an image. The higher the saturation, the more intense the color. The lower the saturation, the more muted the color.
Saturation is determined by how much chroma is in an image. Chroma is the purity of a color, or how much gray is mixed in with the hue. The higher the chroma, the more pure and intense the color. The lower the chroma, the more muted and grayed out the color is.

When it comes to saturation, our eyes are naturally drawn to more saturated colors, but having too many saturated colors in one place together distracts attention.
Low saturation, on the other hand, makes an object look hazy and conveys distance, much like objects in a far distance.

Now, let’s talk about lightness.
Lightness is the psychological experience of the luminosity of an object which is the brightness of an object. Lightness is how light or dark a color appears to be.
For example, when you compare red, yellow, and blue in the same saturation together, yellow actually has the highest lightness value because we perceive it as the brightest.
We can easily observe this aspect using a color pick tool. I want you to look at the lightness value, which is the L value. The lightness value for red is 54, for blue is 30, and for yellow is 98. And if you look at the saturation level, it is the same for all the colors but the only thing changing is the L value.


Light Sculpting
Even though hue, saturation and brightness are basic color adjustments, they are enough to create or accentuate the depth in your image. This is a digital post-processing technique called light sculpting.
This technique is used to create the illusion of three-dimensional space in an image. It is accomplished by using light and shadow to give the appearance of depth and volume.
Light sculpting can be used to add drama and interest to an image, or to correct perspective and proportion.
Advancing and Receding Colors
Now that we have covered the basics of colors and how to manipulate it, we can introduce the concept of advancing and receding colors.
And I think it’s important to learn about this because it helps you to direct the viewer’s attention to where you want them to look at. Advanced colors are also known as warm colors. Applying warm colors or accentuating this color in your image can help to bring your image forward and make them more prominent.
Typical examples of warm colors are orange, yellow, and red.

Receiving colors are also known as cold colors and they evoke a sense of coldness, for example, in areas in your image that are in shadows. The most typical examples of cold colors are green or blue, and they typically evoke a sense of calm and coolness and serve as a background color.

Let’s look at a couple of examples to better understand this concept.


Color Harmony Rule
Now that we have an understanding of how colors work, we will be looking at color harmony rules.
With this specific section you will learn how combining different colors together can create an aesthetically pleasing effect.
Color may sound like a simple topic, but it has actually been studied extensively and yet we still don’t quite understand it fully. For centuries, color theorists have come up with formulas, principles, and guidelines in an attempt to predict the human response to color combination. The idea is that when certain colors are seen together, they can produce a certain pleasing, effective response that is considered harmonious.
These are also known as color harmony rules. These rules are thought to create balance and unity in color. The human brain forms a dynamic equilibrium when it distinguishes the visual interest and the sense of order created by the harmony.
Let’s get right into the classic color harmony rules because these are what you are going to be applying to your images the most.
There are four classic color harmony rules that we will be going through today.
These rules are:
- Complementary
- Triadic
- Analogous
- Monochromatic
To show you the color harmony rule in the images below, I am going to use a free tool called Adobe color. It’s completely free to use and you can get it on colour.adobe.com. You have the option to create an account and doing so will allow you to save the color harmony rules or color themes into your library.
We will talk more about this tool later on as well. What Adobe Color does is very simple but yet effective. Basically it allows you to upload your own image and it will then extract the color themes and pluck it onto the color wheel to show you what kind of color harmony rule the image contains.
We will begin with the first color harmony rule, which is complementary.
The complementary color harmony rule is one of the most common color harmony rules you will come across, and it’s pretty straightforward.
Complimentary colors are colors that are on the opposite side of the color wheel. A typical example is images taken during the golden hour, which is sunset or sunrise. The yellow/golden color of the sunlight is typically contrasted against the blue sky. Since the colors are in polar ends, it implies the presence of the total spectrum.
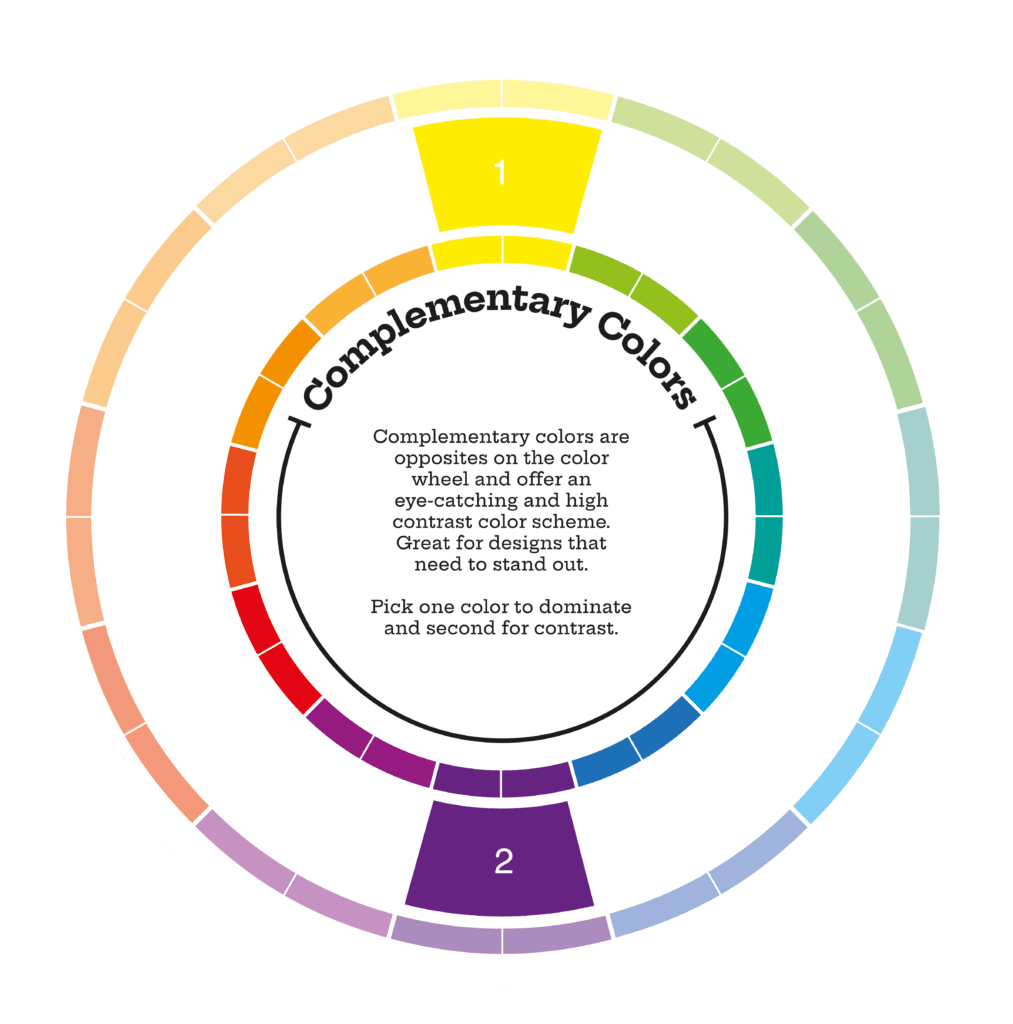
When both colors are mixed in equal quantities, it creates a mutual completion. During a photo editing process, be careful not to saturate both colors in equal amounts because it may mutually exaggerate each other to compete for attention. In the example below, the image has the blue sky significantly less saturated compared to the yellow and golden color of the trees.
Another trick to make complimentary colors more visually pleasing is to make both colors equally less saturated because less saturated complimentary colors naturally have more unity.
The next color harmony rule we are going to look at is the triadic color harmony rule (triangle color).
We have a triadic when three colors on the color wheel are equally spaced apart from each other. Similar to complimentary colors, it also implies the presence of a full spectrum of color. Triadic and complimentary colors share similar visual impact. They create a sense of unity and balance.
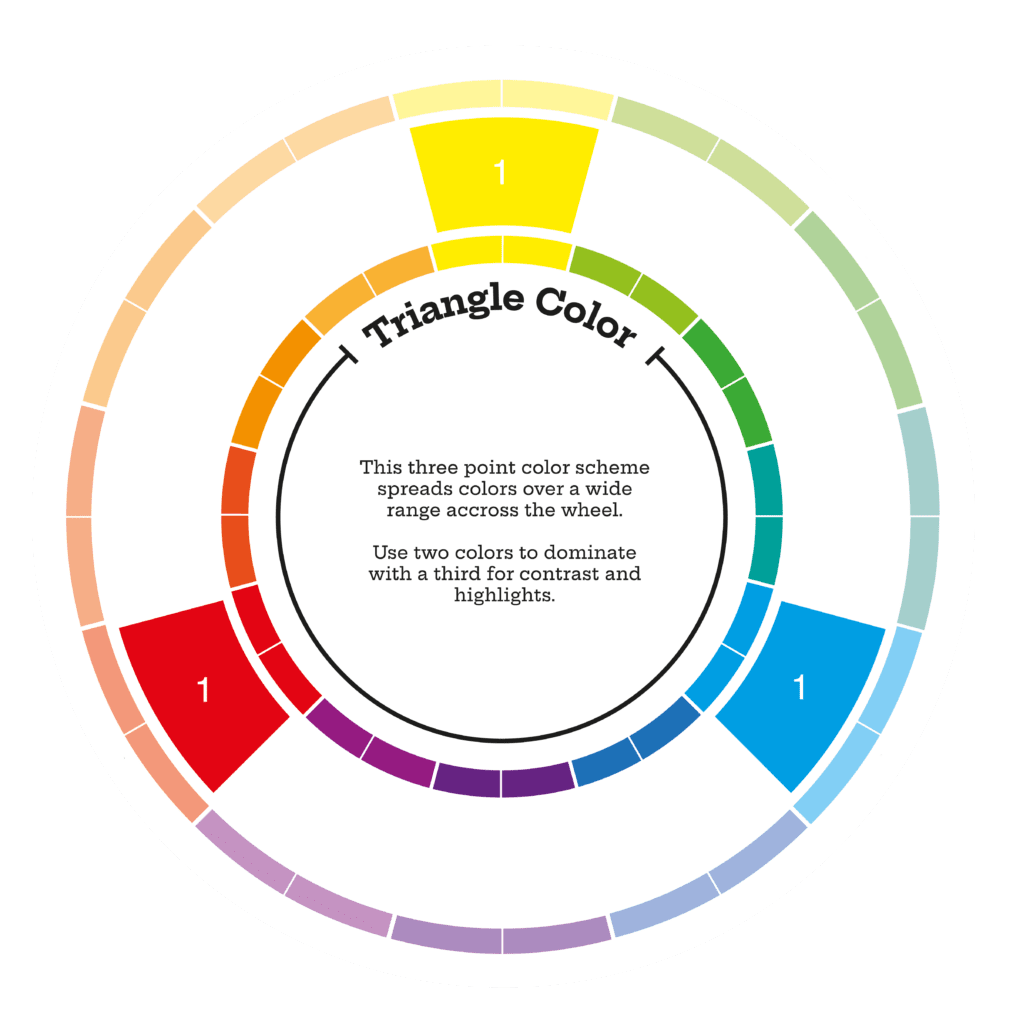
Muted colors tend to work better than saturated colors, just as complimentary colors. When having more colors in the combination, it is good practice to let one color dominate and others used in smaller quantities to avoid competition for attention.
In this example, the dominant color is blue, and there are other colors present in the photo, which are orange, yellow, and white.But these are only present in very small quantities.
The next color harmony rule that we are going to look at is Analogous.
Analogous means similar or comparable on the color wheel. Analogous colors are right next to each other.

Analogous colors make a more harmonious and slightly monochromatic look typically seen in nature. A perfect example is during autumn or fall.
The colors typically have a very similar brightness, lack contrast, and are less vibrant than complementary and triadic colors.
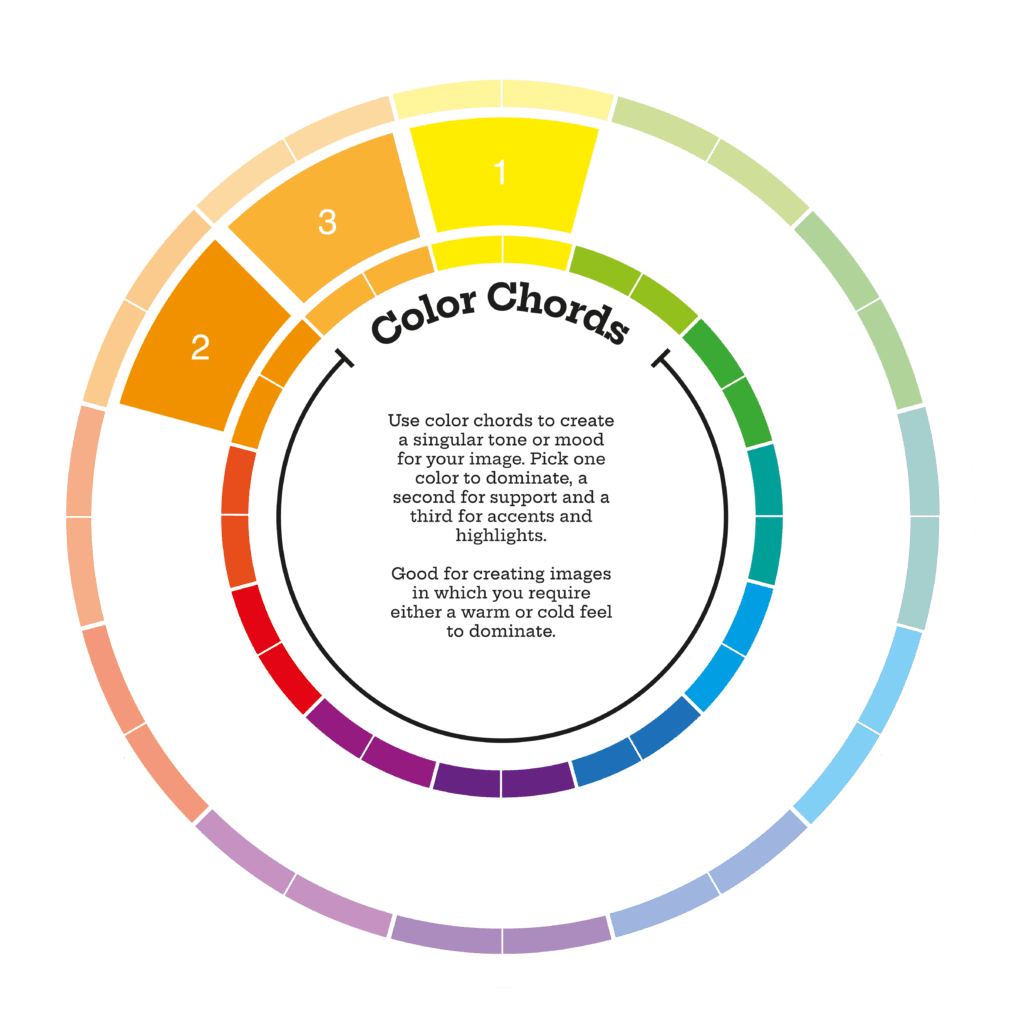
A technique that starts from Analogous colors is Color Chords.
The Color Chords technique is a popular method in design for creating harmonious and visually appealing color palettes. It involves selecting a base color, then choosing colors from the same color family to create an overall palette. This technique allows designers to achieve results that are both pleasing to the eye and work together as a cohesive unit.
To begin, choose your base color as the starting point of your palette. This could be any hue from primary colors like red, blue, yellow or secondary colors like orange, purple, green. Once you have chosen your base color you can pick chords from this same family by manipulating it’s hue, saturation or value (HSV). For example adding hues of lighter shades will give the palette more depth or using hues of darker shades will make it more dramatic.
The fourth color harmony rule that we are going to look at is monochromatic.
Monochromatic colors have only one color, but in combination of tints, shades and tones.

On the color wheel, you can see the colors are aligned in a straight line. It allows a great range of contrasting tones that can be used to attract attention and create a focus.
A monochromatic image tends to have less distraction than a colorful image. This enables the viewer to pay more attention to what the image is about or the story.
Now that we have learned about all four different color harmony rules, let’s move on to the next important part we have to cover when it comes to color. It is the psychology of color and how each color can be associated with different feelings and emotions.
Psychology of Color
Now we are ready to learn about the psychology of color. In particular, the emotion and affective response a color is associated with.
Color psychology is the study of colors in relation to human behavior. It seeks to understand how colors affect our emotions and behaviors.
Color psychology is a relatively new field of study that has only gained popularity in recent years. However, its origins can be traced back to the early 1900s with the work of German psychologist Max Wertheimer.
Wertheimer was interested in how people perceived colors and their effects on human behavior. He conducted several experiments that showed how colors could influence our emotions and thoughts.
Since then, color psychology has been used in a variety of fields, but today we will be focusing on color psychology related to photography.
Color psychology itself is a huge topic and there are textbooks written entirely on it. As a photographer, you don’t need to know everything about color psychology. But you should know some basic knowledge in color association and symbolism.
There are very high chances that you already know some of it.
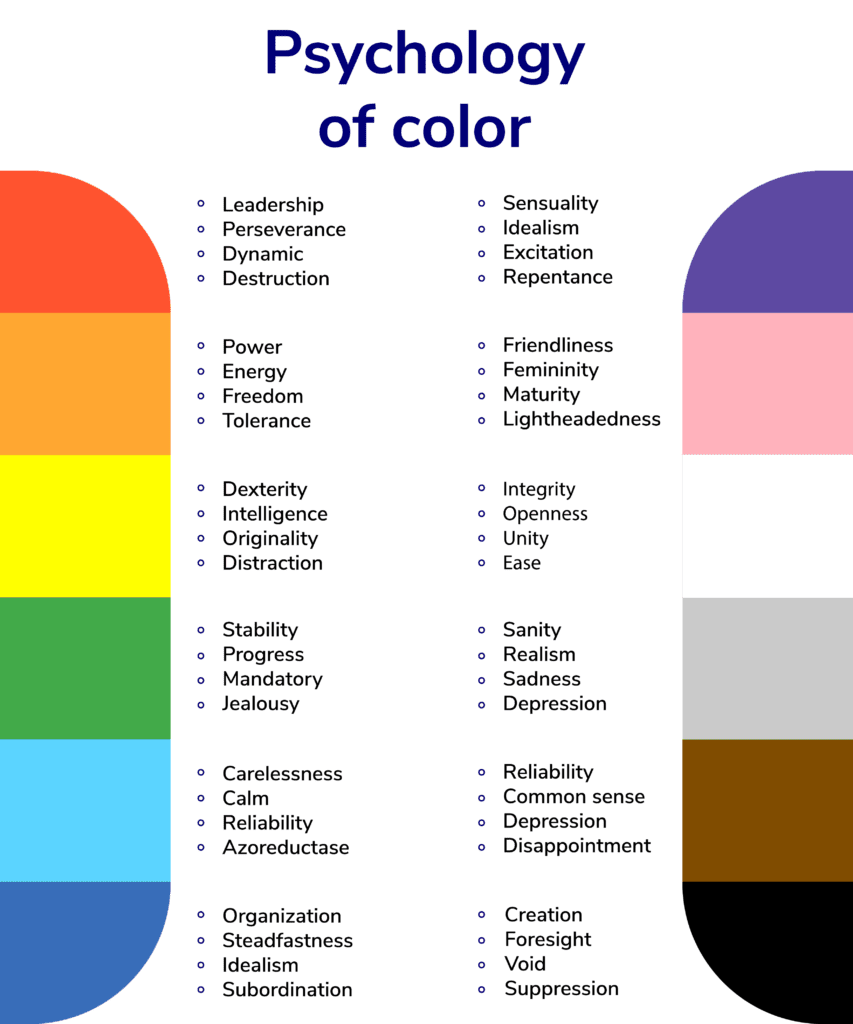
So let’s first start with red.

Red is often associated with passion, love, enthusiasm, and even danger. It is a very intense color, even in small quantities. Red also stimulates affection and enthusiasm in a person because it’s a very intense color and it stands out very well against a dark background.
Because of its nature, you should use red sparingly to avoid visual overstimulation.
Next, we have pink.

Pink is typically associated with playfulness, sweet and girly things. It evokes a less intense response compared to red, and it’s often associated with tenderness and romance.
Similar to red, I would try to use pink sparingly because it can overwhelm visually as well.
Pink is also often associated with purple, magenta, and a touch of green.
Next, we have magenta.

Magenta is often associated with relaxing, friendliness and inviting. Hue wise, it is very close to pink, often associated with spiritual and emotional balance. I would use magenta on a single object, or you can use it more diffusely in a less saturated way.
A good example of using magenta is to use it to boost the light in the evening to create a sense of tranquility.
Now let’s move on to green.

Green is often associated with nature, life, prosperity, and earth. As the color of nature, it stimulates calming, soothing, and tranquility. It stimulates the pituitary gland to secrete histamines and smooth muscle contraction.
Green can be stress relieving and invigorating at the same time. You can be fairly generous when using green, but avoid saturating green too much when applying this to foliage because it looks unnatural.
Next we have turquoise.

Turquoise is a blend of green and blue, and it’s not a common color. It is often associated with spirituality, emotional balance and peace.
Now let’s move on to blue.

Blue is similar to green and it is also a color that is hardwired to us. It is often associated with nature, the sky and the ocean.
Blue symbolizes coolness, space and sadness. It also stimulates the body to produce chemicals that induce calmness and peacefulness. Blue in its more intense form, such as electric blue, evokes a sense of exhilaration. It is frequently used in contrast with yellow and orange.
Next we have yellow.

Yellow is associated with warmth, happiness, and brightness.
Yellow stimulates the nervous system and encourages memories and communication. Yellow is often used to help patients with dementia as an interior color to help them remember. It is also a color with the highest brightest property.
Next we have purple.

Purple sits very close to pink and magenta on a color wheel, and therefore it may evoke a similar response. Having said that, pure purple may be associated with royalty, luxury or sophistication. Because purple is not a natural color, it has been used to symbolize magic or mysticism. You will notice that every villain in an animation or superhero movie has some purple in its color scheme.
Next there is orange.

Orange is often associated with fun, creativity, and happiness. It stimulates activity, our appetite and socialization. Orange is perhaps one of the reasons why watching Sunrise feels so invigorating.
Next we have brown.

Brown is another color that is hardwired to us. It’s associated with nature because it is often linked with wholesomeness, earthy or homely. Brown also reminds us of petrichor. Have you ever been to a woodland right after rain? Petrichor is the earthy scent when rain falls on dry soil. Brown is also associated with food and beverages because it stimulates our appetite.
It is generally a color with a positive association.
Now onto black.

Black is associated with authority, death, and power. It can evoke strong emotions when used strategically, but try to avoid using it too overwhelmingly. The reason for that is that this can cause a negative impact on your image. Black can also be associated with inconspicuous or mystery because of the potential that the color can bring to your image.
These colors are often used in things like product photography, portraiture, or even landscape photography.
Next we have white.

White is associated with cleanliness, purity, or innocence. It is also linked to surrender, strength and conquest. White also helps us to achieve mental clarity and overcome any obstacles that we have in our lives. Since pure white is a rarity, if you adjust the color in your image to pure white, you can make all the colors pop.
Finally, let’s move on to gray.

Gray is quite important in photography because it is the color that is used by the camera to determine the correct exposure.
Gray is also often associated with soothing, neutral, and sometimes boring. In addition, dark gray can also represent elegance just like black.
Now that we have studied the psychology of color, we can finally move on and see how to capture raw data.
Capturing Raw Data
We have now gone through several things, including the foundation of color, psychology of color, and some of the rules to follow when it comes to color harmony.
Now we are going to be looking at the first stage of image creation. That is how to capture the subject or the scene with your camera.
What I want to emphasize here is that, although we do a lot of image editing and image post processing software are getting better every day, there is nothing that beats a technically sound image file.
The even more important thing is that you must always shoot in RAW. Raw is the image file created the moment you click the shutter on a camera. That’s why it is important to always check the settings in your camera before starting shooting.

RAW file is proprietary. This means each camera manufacturer has their own file extension and RAW format. For example, CR2 is the one for Canon Cameras or NEF for Nikon cameras.
Most of the digital cameras available these days can shoot in RAW.
Since it is important to understand the difference between shooting in RAW vs Jpeg, I am going to put some pictures below analyzing the potential that a raw file has in post production and the obvious limitation that a Jpeg file has as well.
The best way to understand this is to give you a rough idea of how your camera works.
When light enters a camera, it first passes through the lens. The lens is made up of a series of curved lenses that bend the light and focus it onto the sensor. The sensor is a piece of silicon that is sensitive to light. When the light hits the sensor, it creates an electrical charge. This charge is then converted into digital information that can be stored on a memory card.

The process of how light travels through a camera lens and hits the sensor is fascinating. It all starts with photons, which are tiny particles of light. When these photons hit the lens, they are bent and focused onto the sensor. The sensor then converts this light into an electrical charge, which is then turned into digital information.
When it comes to image quality, there is a big difference between a RAW image and a JPEG. A raw image is unprocessed and contains all of the data captured by the camera sensor. This data includes things like exposure, white balance, and noise. A JPEG is a processed image that has had all of this data compressed into a smaller file size. The trade-off is that some of the original data is lost in the process, which can impact image quality.
One of the biggest advantages of shooting in raw is that you have complete control over how the final image looks. You can adjust things like exposure and white balance in post-processing without affecting the quality of the image. With a JPEG, any changes you make will result in some loss of detail and clarity.
Raw image is only readable by the camera and needs converting to a readable format, typically by a RAW converter such as Adobe Photoshop or Adobe Lightroom.

If you’re not sure how to set a camera to shoot in raw, I encourage you to check with your camera’s manual. If you want to shoot Jpeg as well, you should shoot Jpeg and raw together. When your camera setting is set to record images Jpeg only, the camera still captures the image in raw, but eventually converts the file into Jpeg and discards all other color data.
It will also apply a preset, tonal and color adjustments, via in camera post processing.
While the Jpeg image has literally no difference compared with the RAW image to the naked eye, it doesn’t have all the additional data for color adjustments in editing later on. This means the image is likely to suffer from degradation such as banding or posterization.
Raw files are significantly larger in size compared to Jpeg, but memory cards are so much more affordable these days, and there’s really no reason why you shouldn’t shoot in raw.
To show you why you should always shoot in raw. I’m going to show you two images, one in raw format and one in Jpeg. I’m going to apply some really extreme color adjustments, which I don’t normally do in real life, and I want to show you how by applying significant adjustments to Jpeg, it can cause image quality degradation.

Now let’s move to the raw file. I am going to apply the same adjustments.

Now comparing both images, it doesn’t look like there’s a lot of difference. But if you go into Jpeg and you zoom in, you may or may not see color banding. But if I go into channels and show you the individual color channels, you can see in the red channels there is a significant degradation in the sky.
And this is called banding.
If you go into the raw file and go into the red channel, you don’t see the image degradation.
I hope you have now learned why you should always shoot in raw instead of Jpeg.
White Balance and Histogram
There are two technical aspects that you need to understand in order to capture your image with the least technical flaw as possible.
These are the white balance and histogram.
White balance is basically a reference color that your camera used to set the overall color in an image. By default, your camera’s white balance is set to automatic, and that works fine most of the time, but you should be cautious when you’re shooting in circumstances like, for example, in a shaded area, or indoors with different ambient light.

Secondly, color clipping.
If you know about histogram, you will probably also know about color or RGB histogram.
When the scene is too bright, you are at risk of overexposing the highlights of the image, which subsequently will affect the right hand side of the histogram, and this will naturally cause color clipping in the RGB channels of the histogram.

Looking at the histogram is quite important because you may have an image that looks properly exposed, but in fact, one of the RGB channels is clipped. When this happens, there will be no data in the part that is being underexposed or overexposed on the image.
I hope you have learned the importance of getting the white balance and the histogram right.
Composition
Now it is time to talk about composition, but not just the classic image composition that we already have heard of and most likely know about. That’s because color plays an important role as well.

Every photograph has a story behind it, and it’s the job of the photographer to be able to tell the story using his or her own creativity in image composition, color and light manipulation.
Having a strong visual appeal is good, but having a story behind is even better. Most of us think creating a story in photography means getting a framing or the image composition good, but in fact, color plays an important role as well.
In order for color to work, you need to give it space. That means composing your frame with color in mind. Unless you are shooting in a studio or somewhere where you can control the light, you will often find yourself working in natural light. But even though you can’t control exactly every light source, you should always consider color when it comes to framing and composition.

For example, if you’re shooting in an environment with only a few dominant colors, you can use a wide angle lens to increase your framing, to include more of that color. The opposite works as well. If you have too many colors in your frame, using a zoom lens to frame a closer shot and include just a few colors, might create a much better composition.
By doing so, you are eliminating distractions and you can actually create a much better composition with color. The temptation is often to include everything you can see within the frame, but by doing so, you are actually creating distractions for the viewer. By limiting dominant colors to only a few, you are creating a more visually pleasing image that is easier for the viewer to see.
That is not always possible, which is where image editing comes into place. In editing, you can often apply selective adjustments, such as desaturation or exposure to create a much better picture that represents what you had in mind at the beginning.
So now we are going to look at some examples of how you can compose your image with color in.


Now that we have seen how to compose an image with color in mind, it is now time to see how to get the best out of your camera.
If you are interested to learn more about composition and the main rules to follow, check out our article on 5 practical tips on how to take better pictures starting today.
Best Tools and Camera Settings
Now it is finally time to go through some tips, tricks, and camera accessories that can help you get the best image in your camera. I think getting a good image in camera is the first key element to get the best out of photo editing.
When shooting landscape photography, you often have to work with the color and light that are given to you.
Although you can’t manipulate these, you can change the camera settings or use accessories to get the closer look you are looking for and are planning to achieve in post production.
But, although we can do lots of editing, having the best image right from the camera is a good step to start with photo editing.
It will produce better results and also save you a lot of time in post production.
As we mentioned above, the first thing that we need to do before shooting is to check that we are capturing images either in RAW or Jpeg and RAW.
For this first step I will be using a Canon 5D MKII as an example, but if you have a different camera you can definitely find the settings online (it is a very similar process for every camera).


Personally I always keep the settings in a way to shoot both RAW and Jpeg. This is very helpful because you can easily preview a Jpeg image and then edit the RAW file.
Now we should talk a little bit about the histogram.
A histogram is an essential tool for photographers, both professional and amateur. Histograms provide a graphical representation of the tonal range in a photograph, showing the amount of dark and light tones. By reading a histogram, one can quickly determine whether or not the exposure of a photo is correct; this allows for adjustments to be made before printing or posting to social media sites.
The information provided by a histogram is based on the brightness levels of each pixel in an image. In addition to helping photographers understand and adjust their exposures, it also assists them in avoiding potential issues such as clipping highlights or shadows and ensuring detail remains intact throughout all areas of the photograph.
The histogram appears in the bottom right or left of the screen and if you don’t see it you can easily press a button that says disp. several times until you see it.
Since we are talking about color theory, I would like you to pay particular attention to the RGB histogram.

Some cameras have RGB histograms which show 3 different channels one next to the other (Red, Green and Blue) but some just have a color histogram that basically shows you one graph with the three channels overlapping each other. They show the same thing but in a different way. But for our purposes, both graphs work.
When you look at the RGB histogram, what I am checking is if there is any color clipping. Clipping happens when part of all the image is over or underexposed.
Overexposure means the histogram is touching on the far right of the graft, and underexposure means the histogram is touching on the far left of the graft.
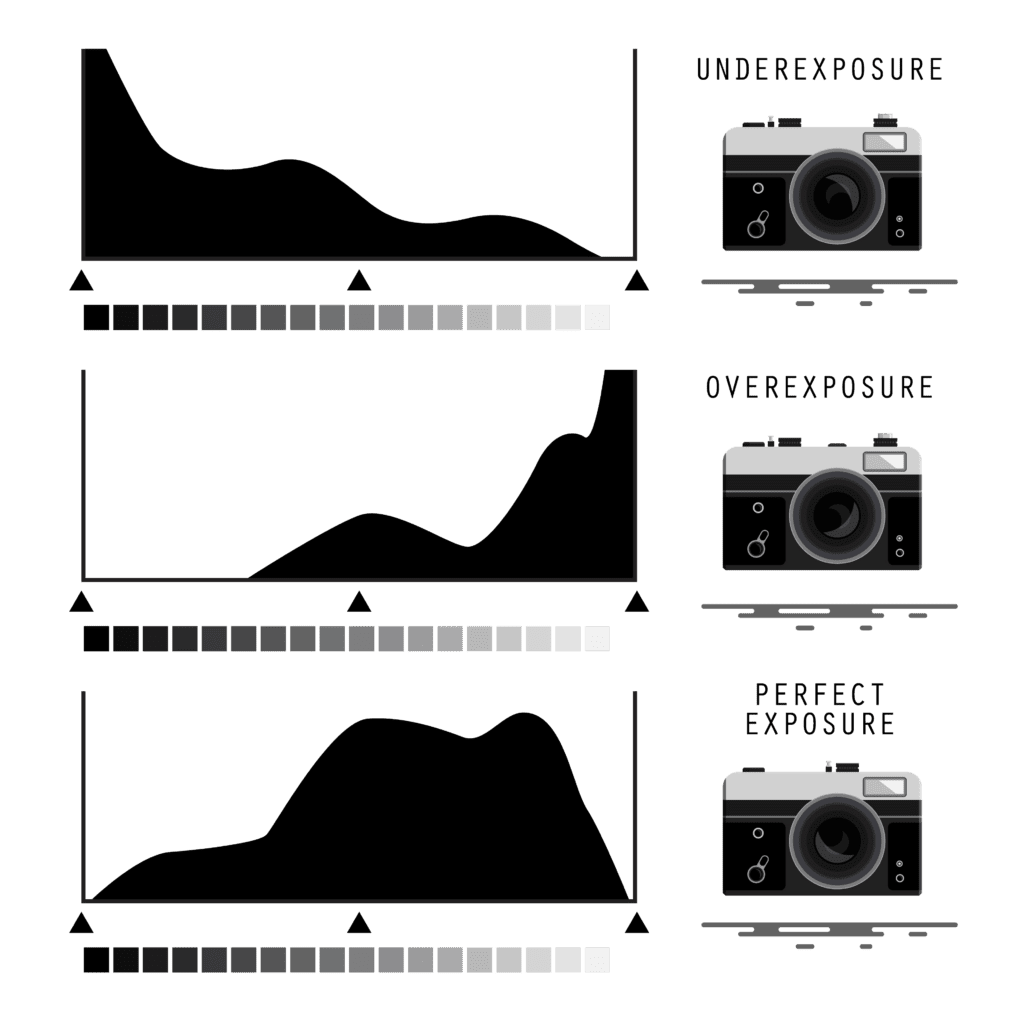
Unfortunately, this is not fixable, even in editing.
Another histogram that I want to show you is called the luminance histogram.

I mentioned luminance histogram because although you can see them, it’s not quite very useful when interpreting from the colors perspective.
A luminance histogram is an important tool when it comes to exposure in a camera. It is essentially a graph that shows the distribution of brightness values in an image.
The x-axis of the graph displays the range of grayscale or luminance levels and the y-axis represents how many pixels fall within each luminance level. By analyzing this information you can determine if their photo is properly exposed or not.
In addition to helping with exposure, a luminance histogram can also be used to identify other potential issues such as overblown highlights and blocked shadows. If there are any areas with no data on the graph, then it indicates those parts of the image may have been clipped off during processing.
Understanding what these histograms represent and how they work is essential for getting great photos every time you take them!
Another important camera setting that I like to talk about is the white balance.

White balance is an important element of photography, as it helps to ensure that colors are accurately represented in a photograph. This is especially important when shooting under different light sources since the color of light can vary greatly from one source to another.
Proper white balance adjustment allows photographers to capture photos with accurate color temperatures and improved overall image quality.
In digital photography, white balance settings are used to adjust the camera’s response to various lighting conditions so that the resulting photographs appear natural and neutral in color. As such, setting an appropriate white balance on your camera will help you avoid unnatural tones or hues in your images.
Additionally, if you’re shooting outdoors or with artificial lights indoors, proper white balancing will allow you to take advantage of natural daylight or tungsten-balanced lighting for more accurate results.
If your white balance isn’t quite right, then the rest of the color in your image will have a color cast. By default, the white balance in your camera is set to automatic, and that normally works fine in most cases.
But in some cases, you might want to change the white balance. You can either use the presets in your camera, or you can use the custom white balance.

In this example, we can easily see how a different white balance completely changes the look of the image captured at the exact same time of the day. From the left side, we have a much higher and therefore cooler white balance (such as 6000-7000K) and then we shift to a much lower and warmer white balance towards the right side (3000-2000K).
The next tool that comes in very handy to every photographer is the polarizing filter.

A polarizing filter is an essential tool for any photographer. It can help to reduce reflections and enhance the contrast of outdoor photos, making them look more vivid and professional. By rotating the filter you can create different effects by selectively reducing light from certain directions, eliminating glare and improving color saturation. This makes it a great choice for landscape photography, allowing photographers to capture crystal clear skies or reflection-free water surfaces with ease.

The benefits of using a polarizing filter go beyond just reducing reflections. They also help to reduce haze, improve clarity and add a bit of warmth to your images. For instance, in harsh sunlight, they are very effective at cutting down on glare while still allowing you to keep some highlights in the shot – creating a more balanced photo with improved detail and contrast.
There are two types of polarizing filters: the circular polarizer and the square 4×4 or 4×5 polarizer.
The circular polarizer is mostly used by photographers and it usually screws on the lens. It comes in very handy and it is easy to carry with you.
The 4×4 and 4×6 filters need a case just to be mounted in front of the lens (what is called Matte Box) and it usually takes much more space. This type of filter is widely used in filmmaking rather than photography.
Another filter that I always carry with me is a variable ND (neutral density) filter.

Variable neutral density (ND) filters are an essential tool for photographers who want to take pictures in a variety of lighting conditions.
These filters reduce the amount of light entering the camera, allowing photographers to use wider apertures and slower shutter speeds even in bright settings. A variable ND filter gives photographers more control over their images by allowing them to dial in exactly how much light they need to get the perfect shot.
Having a variable ND filter is especially useful for landscape photography, where capturing movement such as waves, clouds or trees requires long exposure times that can be difficult without some type of light reduction.

They are extremely helpful when you want to keep a specific depth of field (such as at f2.8) without overexposing anything.
Conclusion
In conclusion, color theory is an important concept to consider when creating beautiful images with photography. It can be used to create depth, lead the viewer’s eye, and evoke a certain mood.
Understanding the basics of color theory will help you make informed decisions about their images and how they want to portray them. By using the color wheel, cool and warm colors, complementary colors, and analogous colors in your photos, you can perfect the color balance of every photograph you capture.
If you have any questions or doubts feel free to comment below and I will reply as fast as I can!
Frequently Asked Questions
Color theory in art is a set of principles and guidelines that explores how colors interact, blend, and impact emotions in visual compositions. It helps artists understand color relationships and use them effectively to convey mood, symbolism, and visual appeal in their creations.
Learning color theory involves studying color wheel concepts, color harmonies (like complementary and analogous colors), color values, and the psychology of color. Online courses, books, tutorials, and practice can all aid in mastering this fundamental skill.
Color theory is crucial because it guides artists and designers in making informed color choices. It enhances visual communication, evokes emotions, establishes brand identities, and creates aesthetic appeal in various creative fields.
Understanding color theory involves grasping the basics of color relationships, like warm and cool colors, color harmonies, contrast, and color psychology. Practice through experimentation and observation of color interactions can deepen your understanding.
To use color theory effectively, consider the mood or message you want to convey. Choose a color palette that aligns with the desired emotional impact. Combine colors harmoniously, create focal points using contrasting colors, and ensure readability and visual balance in your designs.
Practice color theory by experimenting with different color combinations, creating color swatches, analyzing existing artworks or designs, and seeking feedback from peers or mentors. Regular practice hones your color sense.
In graphic design, color theory involves understanding color’s psychological impact on viewers, creating harmonious color schemes, enhancing readability, and ensuring brand consistency. It plays a pivotal role in crafting effective visual communication.
Color theory in psychology examines how colors influence human emotions, behavior, and perceptions. Different colors can evoke specific feelings or reactions, and this understanding is used in various applications, from marketing to therapeutic environments.
Color theory in photography encompasses choosing, manipulating, and combining colors to enhance visual impact. Photographers use color harmonies, contrasts, and the emotional associations of colors to tell compelling stories and evoke emotions in their images.
Color theory is a framework that guides the use of color in art and design, crucial for creating visually appealing and emotionally resonant images in photography. It helps photographers understand how colors interact, influence mood, and contribute to compositions, thereby enhancing the storytelling aspect of their work.
The basic principles of color theory include understanding the color wheel, color harmonies (such as complementary, analogous, and triadic color schemes), and the psychological effects of colors. These fundamentals aid photographers in selecting color palettes that evoke specific feelings and highlight their subjects effectively.
Photographers use color contrast to create visual interest and direct the viewer’s attention. By juxtaposing colors that are directly opposite each other on the color wheel, such as red and blue, they can enhance the vibrancy of their images and make subjects stand out, effectively utilizing complementary color schemes.
Color temperature affects the mood and atmosphere of a photograph. Warm colors (like red and orange) evoke feelings of warmth and comfort, while cool colors (such as blue and green) suggest calmness and serenity. Understanding color temperature allows photographers to manipulate the emotional impact of their images.
Photographers can develop an effective color palette by considering the message or emotion they wish to convey. Utilizing color theory tools, such as the color wheel and principles like the analogous color scheme or the split complementary color scheme, enables the selection of colors that harmonize well and serve the project’s concept.
Complementary colors, situated opposite each other on the color wheel, create high contrast and vibrant visuals when used together in photography. This dual-color scheme is particularly effective for highlighting key elements within a frame, adding energy and visual appeal to the composition.
Understanding color theory enhances a photographer’s ability to perceive and appreciate subtle nuances in color and light. It aids in developing an intuitive sense for color relationships and compositions, improving color vision and the ability to predict how different colors will interact in an image.
Modern color theory in photography is often applied through the creative use of color grading, manipulation of color contrast, and the deliberate choice of color palettes that evoke specific eras or moods. For instance, a photographer might use a monochromatic color scheme to create a cohesive, focused aesthetic, or employ additive and subtractive color mixing techniques in post-processing to achieve unique effects.