A high-angle shot places the camera above the subject and looks downward. It can reveal spatial relationships, isolate a figure or emphasize a viewpoint, but it does not automatically mean weakness or powerlessness. Staging, distance, performance and the surrounding shots change the meaning.
Columbia’s Film Language Glossary defines the angle by camera position and downward view. Shot size is a separate choice: both a close view and a wide view can be high angle.
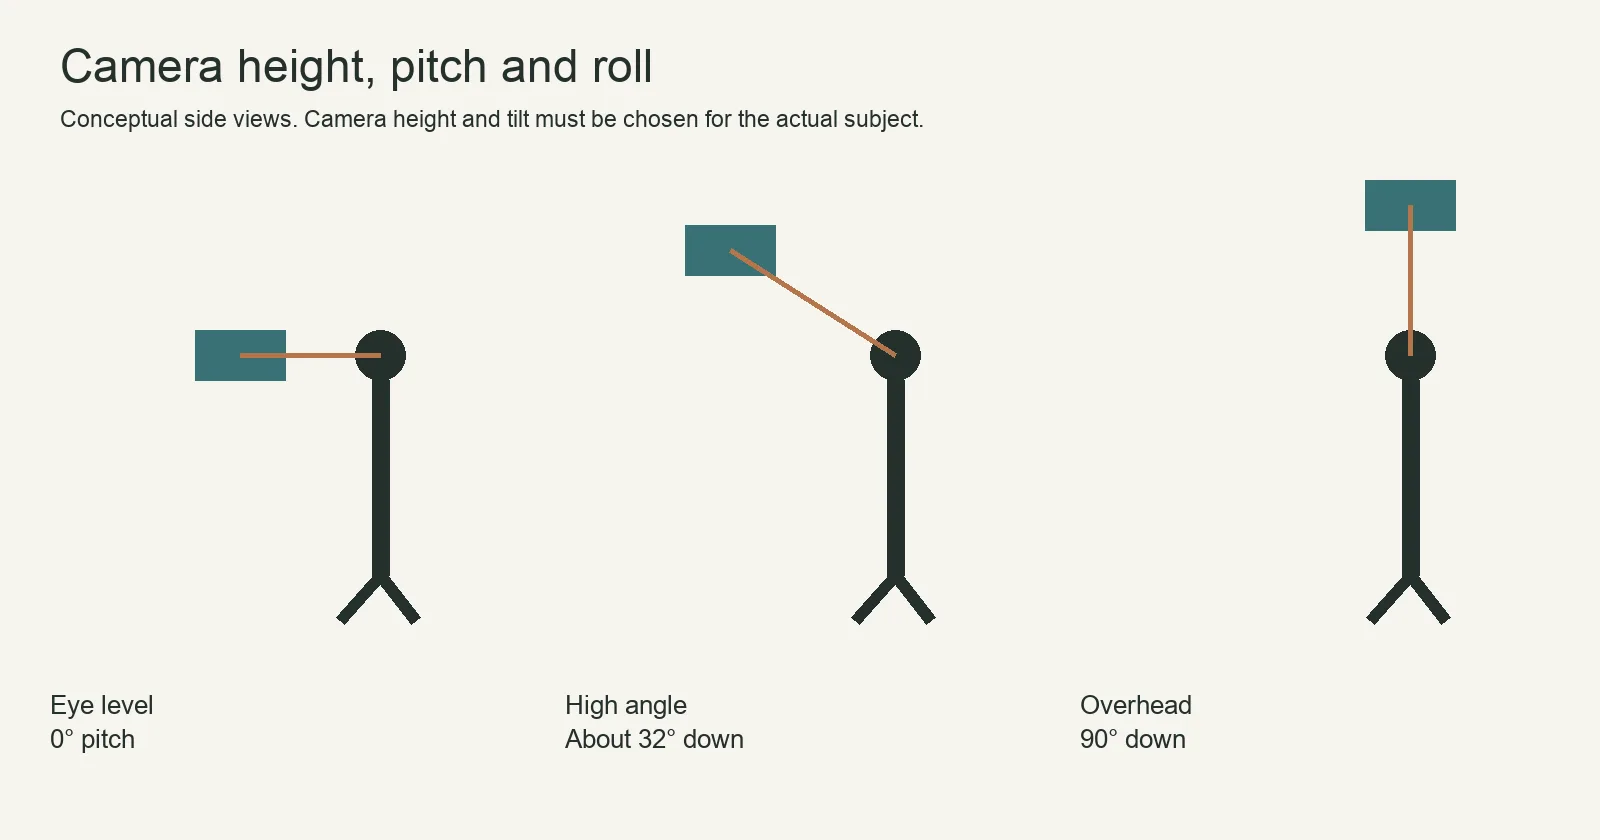
Eye level, high angle and overhead
| Position | What it can reveal | What to check |
|---|---|---|
| Eye level | A direct relationship with the subject. | Whose eye height defines the viewpoint? |
| High angle | More of the floor, arrangement or space around a subject. | Does the downward view hide an important face or gesture? |
| Overhead / near-overhead | A more plan-like view of objects and movement. | Does the geometry clarify the action or make identity harder to read? |
A source-linked film frame
Columbia’s “Death and the Detective” excerpt from Psycho (1960) identifies Alfred Hitchcock as director and 1998 Universal Home Video as its source edition. At approximately 00:18 in the embedded excerpt, the camera looks down at the detective with the patterned floor visible behind him. That downward view makes his position in the stairway space legible while retaining his face.
This is an observation of a specific frame, not a rule that every elevated camera signifies helplessness. Compare it with the surrounding cuts in the linked excerpt. The timestamp is local to that player, not a full-film timecode. We link to the source without reproducing its film still.
Give the angle a scene-specific purpose
In a packing scene, a modest downward view can show which objects remain on a table. The same angle on a solitary figure in a large room can emphasize the surrounding empty space. Neither example establishes a fixed emotional code. Explain what this frame reveals that an eye-level view would not.
A high camera looking horizontally at a distant horizon is not automatically a downward view of the subject. Record height, pitch, position and framing separately when planning or comparing examples.
Decide what the higher viewpoint reveals
In the packing example, an eye-level camera may show the person’s face while the case lid hides its contents. A downward view can reveal the empty compartment or the object left on the table. The angle is useful because it changes the information available to the audience.
Before raising the camera, name the information that needs to become visible. If the important detail remains hidden behind a hand or prop, a higher position alone has not solved the problem. Adjust blocking, object placement or shot size while preserving the intended action.
A high angle does not always belong to a character
An elevated shot can establish geography without representing anyone’s literal point of view. To make it feel like a character’s view, the surrounding sequence may need an eyeline, a plausible position and a matching direction. A shot from an otherwise unexplained ceiling position should not automatically be labeled the seated character’s viewpoint.
Columbia’s glossary explicitly cautions against reading every downward view as a metaphor for low status. Record what the shot shows first, then consider how the scene’s performance and editing guide an interpretation.
Plan the angle across the cut
Suppose a character looks into a case and the next shot looks down at its contents. Keep the object arrangement and direction of movement consistent enough for the audience to understand the relation. If a hand enters from an unexpected side, check camera position, blocking and the cut rather than blaming the high angle itself.
Also consider what happens when you return to a face. A very steep view may obscure an expression that was the scene’s main point. You may need a separate reaction, or a less steep angle that holds both face and object. More visible floor is not automatically more useful information.
A shot-list entry that can be reproduced
For an original tabletop practice scene, record: “Character removes the final item from the case; moderately raised camera looking down; hands, compartment and table edge visible; static frame; cut after the item clears the case.” Add the actual camera position, focal length and reference frame when you make the shot.
This is more useful than writing only “high angle, dramatic.” It states the action, composition and edit point. Keep the support requirement separate and within an appropriate setup; the creative description is not a rigging instruction.
Review the result without forcing a meaning
- If the action is unclear, inspect overlaps and hand placement.
- If the subject disappears into the floor pattern, simplify the background or change separation.
- If the face becomes unreadable, reduce the downward angle or plan another view.
- If the shot feels disconnected, compare eyelines, screen direction and the preceding image.
Make one controlled change at a time and compare the sequence, not only a still frame. The strongest choice is the angle that makes the intended scene understandable and expressive, even if it is less elevated than the first plan.
A simple, safe practice setup
- Choose a small tabletop subject or a seated subject so a modest height change is enough.
- Use a suitable ordinary tripod on level ground, within its rated configuration.
- Compare an eye-level view with a slightly raised, downward view while keeping the intended action readable.
- Check framing and support before recording. Avoid leaning over a subject or improvising overhead mounts.
If the desired view needs elevated platforms, suspended equipment or specialized rigging, involve competent production personnel. This guide does not provide a DIY rigging method.
Compare angle, size and roll separately
The wide-shot guide concerns how much of the scene is included. The Dutch-angle guide concerns camera roll and a tilted horizon. The dolly guide concerns movement. Combining them can be useful, but changing one at a time makes the effect easier to understand.
The original diagram isolates camera pitch. For your own comparison, keep the subject and shot size consistent as you change the angle.