The best free color grading software in 2026 is DaVinci Resolve. It’s the only free program with true node-based grading, a full scopes suite, and, new this year, free HDR grading. There’s no watermark, and nothing up to 4K is capped. The rest of this guide covers when a lighter tool is the smarter pick, and exactly what each free version does and doesn’t give you.
Last updated: 2026. Every free-tier limit below was checked against each tool’s official site.
Quick picks by who you are:
- Serious about color: DaVinci Resolve (free)
- Want open-source with no limits: Kdenlive or Shotcut
- On Windows and want simple: VSDC
- On a Mac or iPhone, just starting: iMovie
Free color grading software compared
Every free tier holds something back: an export cap, a resolution ceiling, or a watermark on certain assets. Here’s the side-by-side with those caveats out in the open.
| Tool | Free export cap | Watermark | Platforms | Grading model | Best for |
|---|---|---|---|---|---|
| DaVinci Resolve | 4K, 60fps, 8-bit | None | Windows, Mac, Linux | Node-based (pro-grade) | Serious grading & aspiring colorists |
| Kdenlive | Unlimited | None | Windows, Mac, Linux | Curves + color wheels (layer) | Free, open-source, no limits |
| Shotcut | Unlimited | None | Windows, Mac, Linux | Three-way wheels (layer) | Simple editing with real color tools |
| VSDC | Up to 8K (no GPU acceleration) | None | Windows, iOS | Wheels + sliders | Windows-only setups |
| Lightworks (Free) | 720p only | None | Windows, Mac, Linux | Basic (layer) | Trying a pro NLE / learning |
| iMovie | 4K | None | Mac, iOS | Basic sliders | Mac & iPhone beginners |
Two names you’ll see on older lists are missing on purpose. HitFilm Express was discontinued in January 2025 when its owner retired the whole FXhome line, so there’s no supported free version to recommend anymore. CapCut’s free desktop tier is now capped at 1080p, and its watermarking depends on which assets you use, so it no longer belongs on a serious color shortlist.
Color correction vs color grading (they’re not the same)
Color correction makes your footage look true to life: it fixes white balance, exposure, and off-looking hues so the image reads the way your eye saw the scene. It’s the technical clean-up pass.
Color grading (or colour grading, if you use the British spelling) is the creative pass that comes after. Once the colors are accurate, grading shapes mood and style: the teal-and-orange of a blockbuster, the cool desaturation of a thriller, the warm glow of a wedding film. Correction is about accuracy; grading is about feeling. It helps to know a little color theory here. The best free tools below let you do both, but only some give you the finishing controls that grading really calls for.
Node-based vs layer-based grading
This is the single biggest difference between the tools on this list. Node-based grading (DaVinci Resolve) lets you chain adjustments as separate, rewireable nodes, so you can isolate a face, grade the background separately, and reorder the whole pipeline without starting over. It’s how professional colorists work. Layer-based or slider tools (everything else here) stack effects more simply. That’s easier to learn and perfectly fine for most videos, but it hits a ceiling faster on complex shots. If you plan to take color seriously, learning nodes early pays off.
The best free color grading software, tool by tool
1. DaVinci Resolve (the best free option overall)

DaVinci Resolve is the same software used to grade Hollywood features, and the free version holds back almost nothing. You get the full node-based Color page, primary and custom color wheels, curves on every channel, qualifiers, power windows, tracking, LUTs, and a complete scopes suite (waveform, parade, vectorscope, histogram). No other free tool comes close. New to it? Our guide to offset in DaVinci Resolve is a good first stop once you open the Color page.
In 2026, the free edition (now DaVinci Resolve 21) added two things that used to be paid-only: HDR grading and cloud collaboration. There’s no watermark and no time limit. The free version exports up to 4K at 60fps in 8-bit; the paid Studio upgrade ($295, a one-time purchase with no subscription) unlocks 10-bit, 8K, faster GPU noise reduction, and the AI tools. Unless you’re delivering 10-bit HDR masters or shooting for 8K, you won’t hit the free version’s walls.
The one catch: Resolve has the steepest learning curve here. Day one, the Color page greets you with a node graph and rows of palettes instead of the familiar timeline sliders, and there’s no one-click auto button to hide behind. That’s what the course below is for.
Ready to actually grade, not just install it?
Free software gives you the tools. Turning raw footage into a cinematic look is a craft, and it’s the part that takes colorists years to learn. Mastering the Artistry of Color Correction and Blackmagic’s Resolve is a masterclass from Natasha Leonnet, a working Hollywood colorist with over 20 years of experience, built on the exact free software above. You’ll go from a blank Color page to grading with intent, node by node.
2. Kdenlive (best free open-source all-rounder)
Kdenlive is a fully free, open-source editor with a more capable color toolkit than most: Curves, a Lift/Gamma/Gain wheel effect, white balance, and 3D LUT support, all with no watermark, no export cap, and no locked features. It runs on Windows, Mac, and Linux. It’s layer-based rather than node-based, so it won’t replace Resolve for finishing work, but it’s the free editor to reach for when you want more curve control than Shotcut gives you.
3. Shotcut (simple, unlimited, cross-platform)
Shotcut is another free, open-source option with every feature unlocked from install: no trial, no watermark, no limits. Its three-way color wheels and scopes are more than most free editors bother to include. It’s a great choice if Kdenlive doesn’t click for you, or if you want the simplest possible path to real color controls on any operating system.
4. VSDC (best for Windows-only setups)

VSDC Free Video Editor is a solid Windows pick with primary and secondary color correction, color wheels, and shadow/midtone/highlight sliders, all watermark-free and able to export up to 8K. The two things to know: it’s Windows-only on the desktop (there’s an iOS app, but no Mac or Linux build), and the free version has no hardware acceleration, so 4K and 8K renders are slow. For light color work on a Windows machine, it’s a capable free choice.
5. Lightworks Free (a pro NLE, but a 720p export cap)
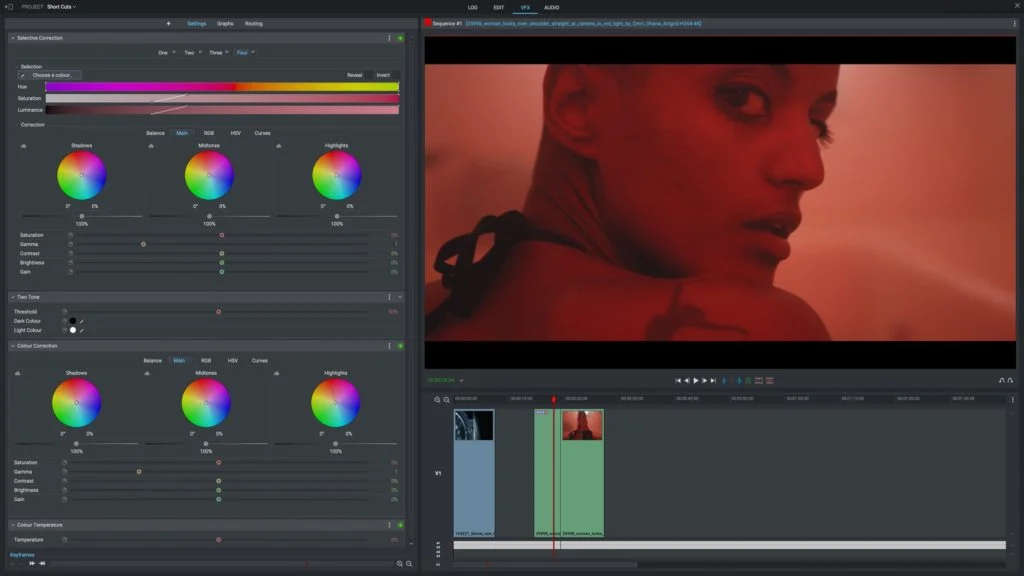
Lightworks is a long-established professional editor, and its free version is a good way to learn the interface. One recent change to note: free exports are now capped at 720p, MP4 only. That makes the free tier best as a trial or learning tool rather than something you deliver finished work from. Real 4K output and the deeper color tools require the Create or Pro subscription (roughly $10 to $24 per month depending on tier and billing).
6. iMovie (best for Mac and iPhone beginners)
iMovie is free on every Mac and iPhone, with no watermark and 4K export. Its color tools are basic (a shadows/midtones/highlights slider, saturation, and temperature) rather than a real grading suite, but for quick, clean correction with zero learning curve, it’s the friendliest starting point on Apple devices. When you outgrow it, the natural step up is Final Cut Pro ($299.99, one-time).
Which free tool should you pick?
- YouTubers and filmmakers who want the best look: DaVinci Resolve. It’s free, professional, and the same tool the pros use. If you’re just starting out, our guide to making a movie pairs well with it.
- Editors who want zero limits and no upsells: Kdenlive or Shotcut, both fully free and open-source.
- Windows users who want something light: VSDC.
- Mac or iPhone beginners: iMovie to start, then Resolve when the basic sliders stop giving you what you want.
- Just learning an interface: Lightworks Free is fine, as long as you know about the 720p export cap.
Free LUTs: a shortcut to a cinematic look
A LUT (Look-Up Table) is a preset that remaps your footage’s colors in one click, and every tool here except the most basic can apply one. LUTs are a fast way to land a starting look, but treat them as a start, not a finish. Get exposure and white balance right first, or a LUT will simply amplify whatever was already off. For free options, Blackmagic ships film-emulation LUTs right inside Resolve’s Color page, and most camera brands publish free log-to-Rec.709 conversions (Sony for S-Log3, Canon for C-Log) that turn flat log footage into a usable starting point. Drop one on a node after you’ve balanced the shot, not before.
Can your computer handle color grading?
Color grading, and DaVinci Resolve especially, leans on your GPU more than your CPU. A realistic minimum for smooth 1080p grading in Resolve is a dedicated graphics card with at least 4GB of VRAM and 16GB of system RAM; 8GB of VRAM and 32GB of RAM make 4K comfortable. On an older or lower-spec machine, you have good options: work in 1080p, use Resolve’s optimized-media and proxy workflow, or reach for the lighter tools here. Kdenlive, Shotcut, and iMovie run happily on modest hardware, so a slow computer is never a reason to skip color entirely.
When is paid software worth it?
For most people, it isn’t. DaVinci Resolve free covers real professional grading, and you only need to spend money when you hit a specific wall:
- DaVinci Resolve Studio ($295, one-time): for 10-bit, 8K, faster GPU noise reduction, and the AI tools. The best-value upgrade in the whole category.
- Adobe Premiere Pro (subscription): if you’re already in the Adobe ecosystem and want Lumetri grading inside your existing edit.
- Final Cut Pro ($299.99, one-time): for Mac editors who want a fast, native NLE with solid built-in color.
Frequently asked questions
Is DaVinci Resolve really 100% free?
Yes. The free version has no watermark, no time limit, and no locked Color page. It exports up to 4K at 60fps in 8-bit. The only reasons to pay for Studio are 10-bit, resolutions above 4K, faster noise reduction, and the AI features, none of which most creators need.
What software do professional colorists use?
DaVinci Resolve is the industry standard and grades a huge share of film and TV. At the very high end, some facilities also use Baselight and Autodesk Flame, but Resolve is what most working colorists use daily, and it’s the same tool you can download for free.
What’s the best free color grading software for beginners?
If you want to learn real grading, start with DaVinci Resolve, since it’s free and you’ll never outgrow it. If you want the gentlest possible start, iMovie (Mac) or Shotcut (any platform) gets you correcting color in minutes before you graduate to Resolve.
Can I grade on an old or low-spec computer?
Yes. Grade in 1080p, use proxy or optimized media in Resolve, or pick a lighter tool like Kdenlive, Shotcut, or iMovie. A dedicated GPU with 4GB of VRAM and 16GB of RAM is a comfortable floor for smooth 1080p work.
Is Lightworks still good if the free version only exports 720p?
It’s still a capable editor to learn on, but the 720p free cap means you shouldn’t rely on it for finished 4K deliverables. If you want free 4K output, DaVinci Resolve, Kdenlive, or Shotcut are better choices.
So, what should you install?
You do not need to spend anything to grade professionally in 2026. DaVinci Resolve gives you a Hollywood-grade toolset for free, and Kdenlive, Shotcut, VSDC, and iMovie all cover lighter needs without a watermark. So download DaVinci Resolve, grade one real project this week, and you’ll learn more than any spec sheet can teach you.